

They are still sitting out in the yard tonight because I had some . . . issues . . . with painting the frames white. But now I know EXACTLY how I should have done it. For next time. Here's the process {which is where this post gets really boring unless you want to try this yourself -- because I KNOW you weren't bored with my rambling until just now, right?} I started out by covering the mirrored part of the door with contact {shelf} paper. I just used leftover ends of rolls from other projects, but you could go get some specially for this and make it cute. {If you're like that, I guess.}
I tried really hard on the first door to get the paper stuck to the glass with no air bubbles, but soon decided that was a physical impossibility. Also, it doesn't really matter in the end. Trim off the excess paper around the edges with an x-acto knife. Now, here is where I could have saved myself a world of hurt. Take your doors outside and spray the frame. NOW, while the mirror is all covered up and you don't have anything fancy to wreck. Trust me on this one.
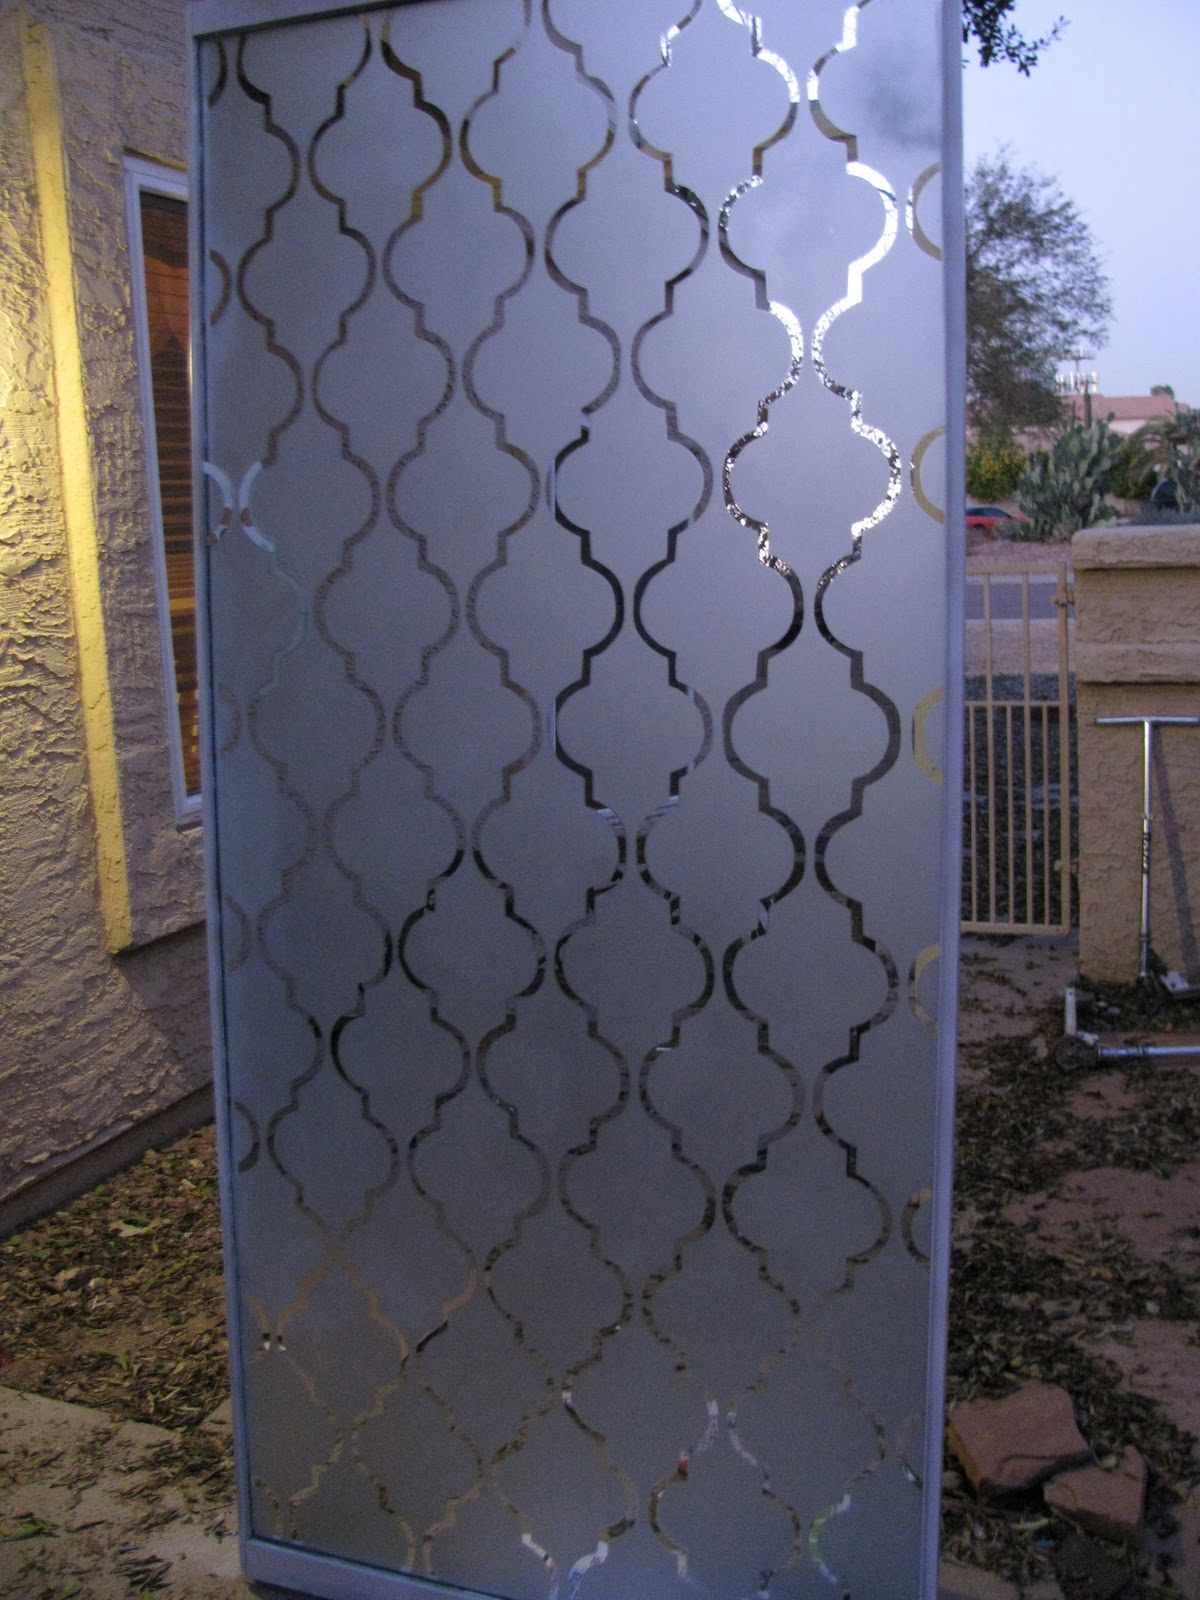
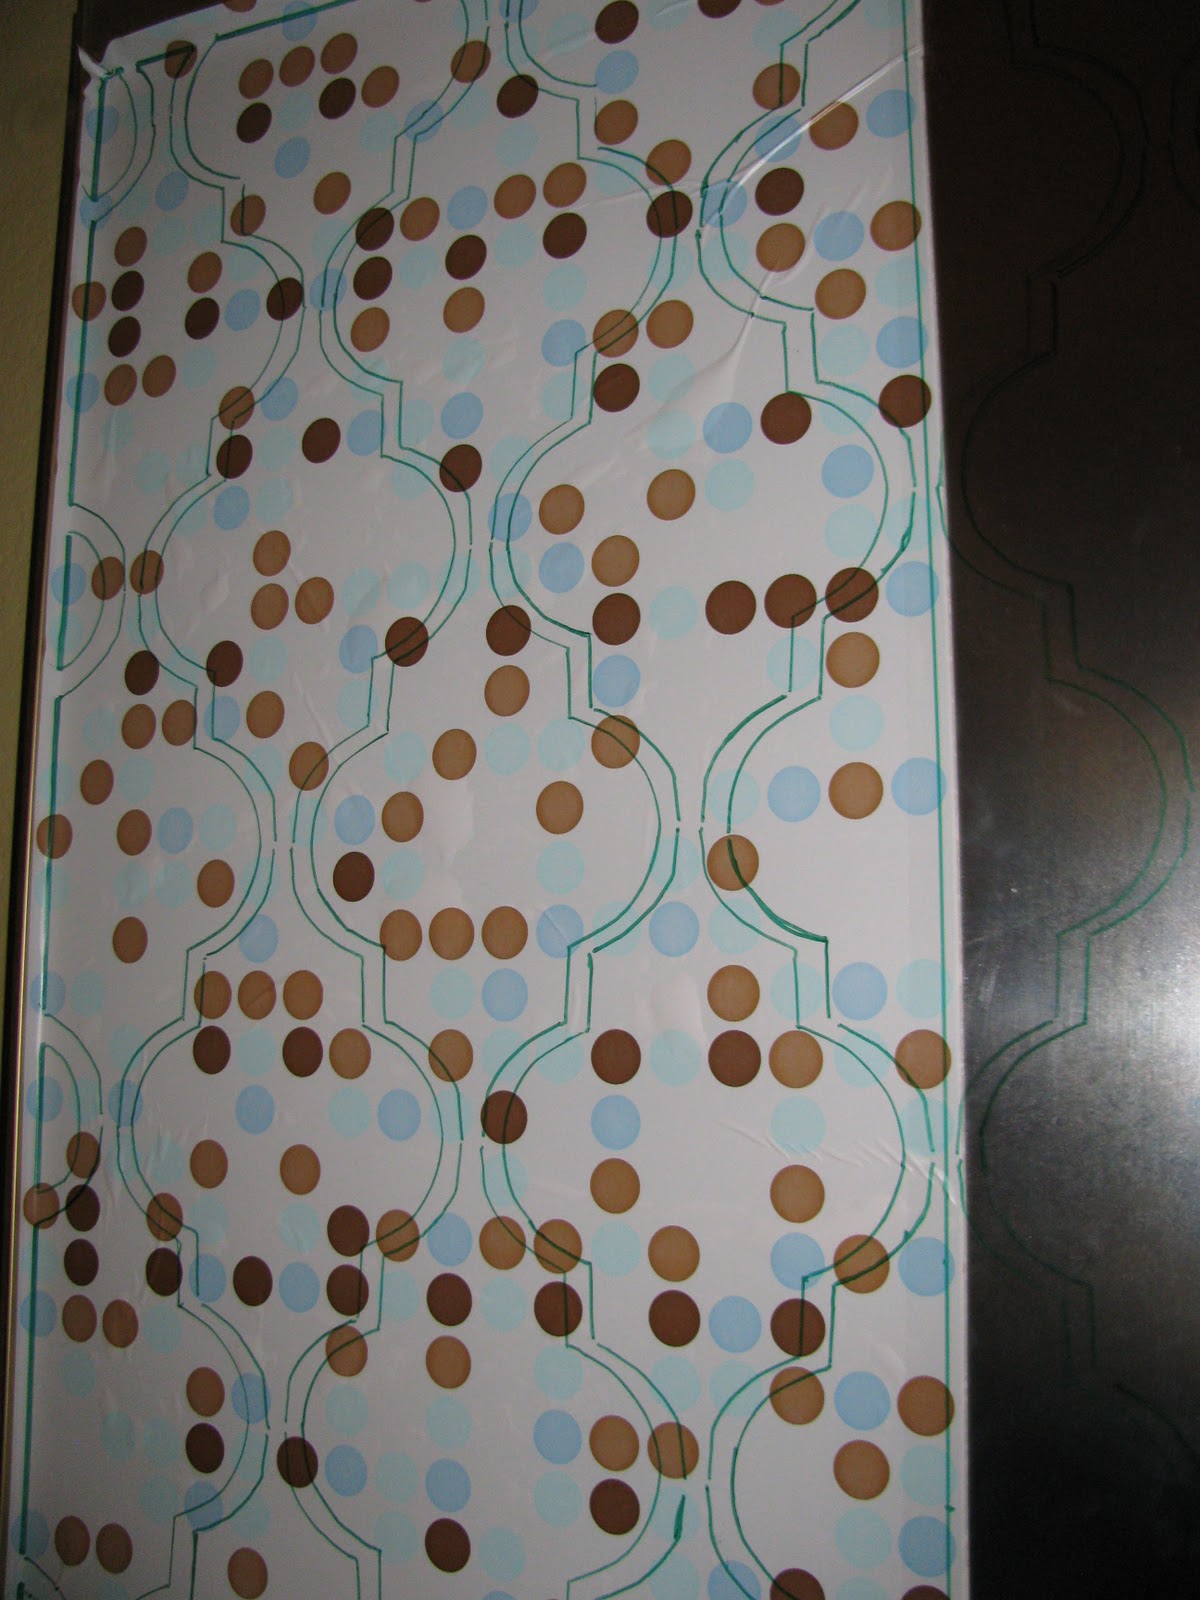
Once the frame is dry, measure out and mark the center line horizontally and vertically. That will help you keep your pattern centered and straight. I printed out the same pattern that Robin used for her closet and traced it out onto the contact paper with a Sharpie. I just eye-balled the spacing, and, truly, it's not perfect, but it's good enough. The finished project is pretty forgiving. Then I used my handy x-acto knife to cut out the pattern, leaving only the skinny strips between the pretty shapes stuck to the mirror, like so {in progress on the left}:
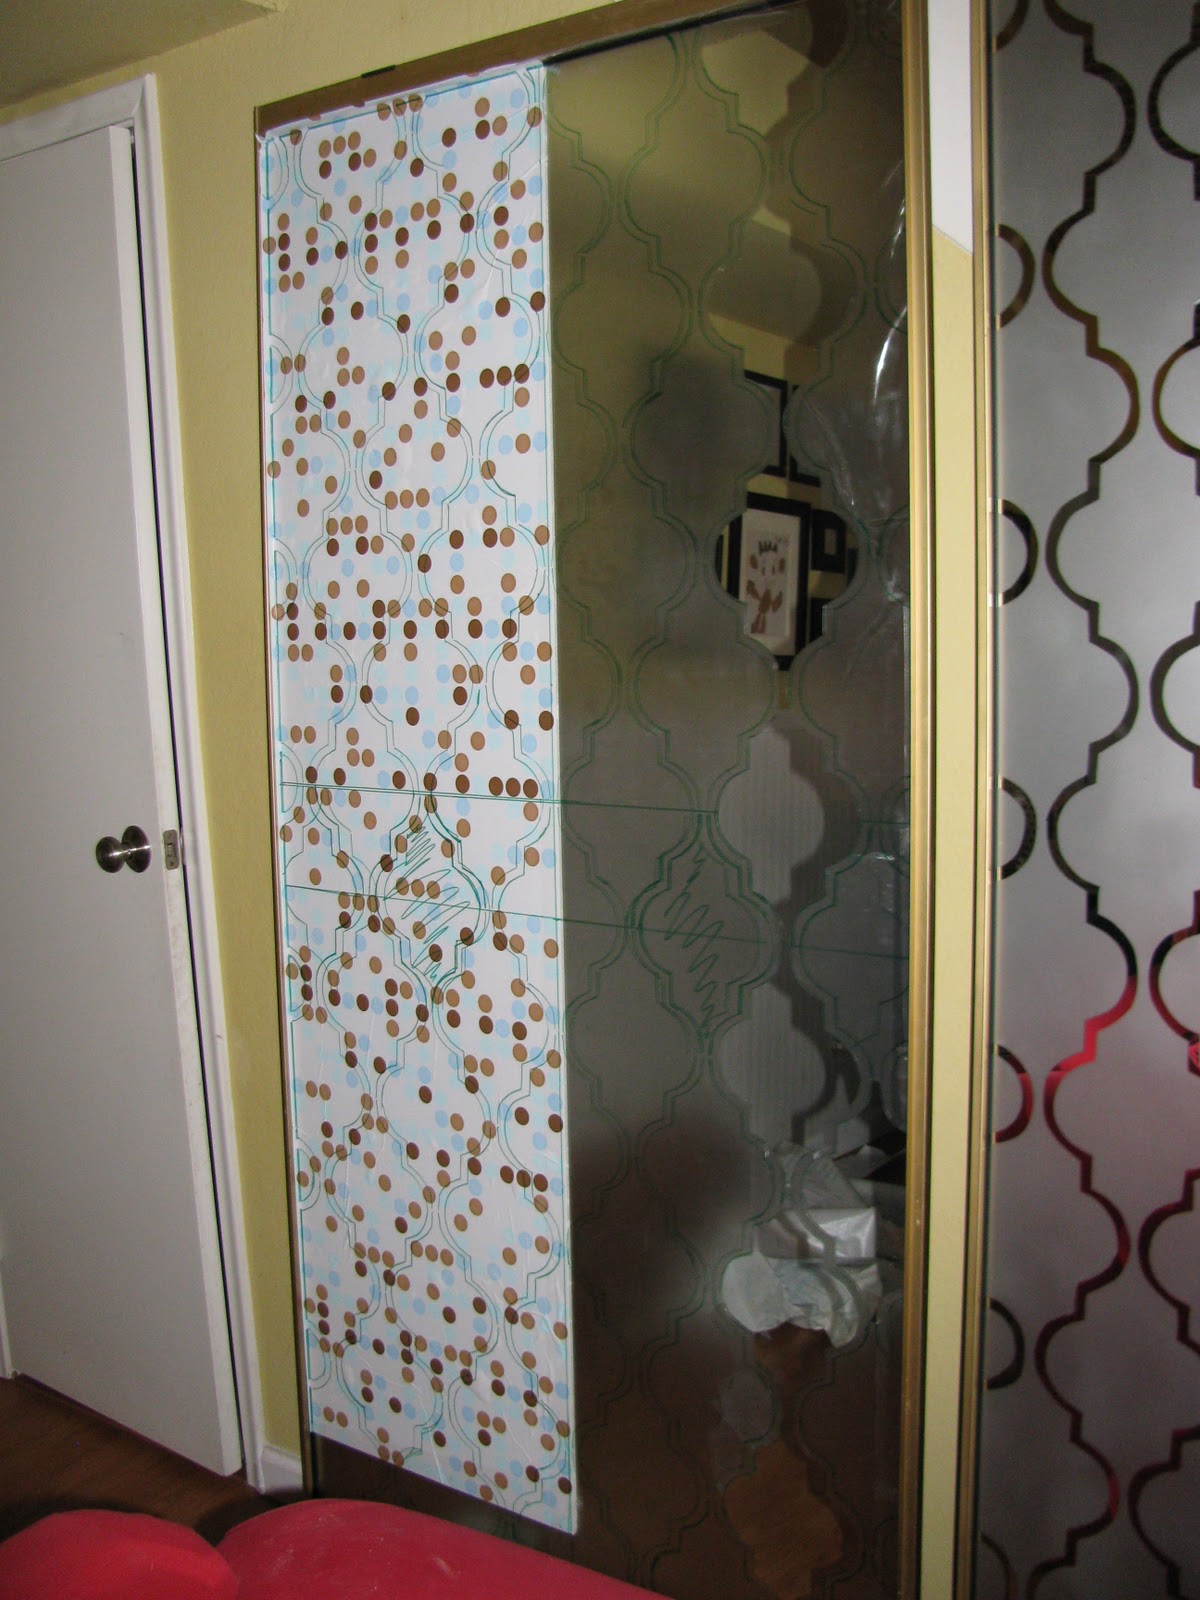
I went back when I was done cutting and removing and pressed all the remaining strips of contact paper down really good so the paint wouldn't get underneath. {Here is where you take care of your air-bubble situation.) Then you take them outside and spray them with the frosting spray. I used Valspar Glass Frosting spray and it worked great. I did two or three coats until I couldn't see myself anymore in the mirror. It took a can and a half to do two doors like the one below.

Once the spray is dry (after about an hour according to the can, but I could only wait about 15 minutes) peel off the strips of contact paper and enjoy the loveliness. I learned {the hard, sad way} that Windex removes the frosting spray {even after the paint sat and cured for several days} so this is might be a project for a low traffic area that won't need to be cleaned super often. Just sayin'. Here's the finished door again in all it's frosted glory:


I love the little bits of mirror showing through that reflect the light without really reflecting images.
Here's the breakdown:
Roll of contact paper: $6 (if you don't already have some)
Two cans of Frosting Spray: $11
Finishing a project 8 years in the making: Priceless!


this looks so cool! did it take forever to cut it all out?
ReplyDeleteThanks!! It wasn't too bad. I just turned on a movie and cut while I watched.
ReplyDeleteI love the pattern! It looks great.
ReplyDeleteThose turned out so pretty. I never would have thought to frost closet mirrors. Beautiful!
ReplyDeleteAnother beautiful project! I love everything you do. I always read your blog but have been lame about commenting lately. And the onesies with the legwarmer sleeves--a-DOR-able!!! I got your Christmas card today and of course loved it. I was getting worried I'm not on your list anymore. I didn't even do cards this year but maybe I'll think about Valentine's cards like your friend--that's a great idea! Know that I'm still read, reading your blog faithfully and perpetually in awe of your talent.
ReplyDeleteI absolutely love these mirrors! Great Job!
ReplyDeleteI love this! So creative and stylish!! I love this pattern. Do you know what it is called? I am wanting a similar pattern for a fabric headboard, but don't know what it would be called.
ReplyDeleteThanks!!
wow! great job! I have 3 gynormas ones in my bedroom. Thinking of doing something like this, but considering taking them off the tracks, turning them around and doing it on the other side. hmmm sounds like a lot of trouble doesn't it? maybe talking myself out of it right about now.
ReplyDeletegreat tute!
saw your feature over at jens T&J
gail
I totally love the remake and I'm so impressed that you actually cut the pattern with your x-acto knife!! It would take forever!! But the finish job is awesome way to go!!
ReplyDeleteWhat a fantastic upgrade!
ReplyDeleteWow, this is going to be trend setting! What a great transformation. I too love just browsing Jen's blog for all the cool inspiration.
ReplyDeleteI have those mirrored doors too. What a great idea!
ReplyDeleteHoly Cow! They turned out fantastic! They look so chic! Thanks for linking to my hall closet too.
ReplyDeleteI love (NOT) my brassy mirrored doors too! Maybe this summer during scout camp???
ReplyDeleteKeep those amazing ideas coming - I love reading/seeing all the progress around your neck of the woods. It is truly inspiring to me!
Just found your blog and umm I'm totally obsessed with this! Great job!! That must have taken you FOREVER!! I love the pattern you chose too. And for eyeballing it, you did an AMAZING job! Sheesh! <3
ReplyDeleteAmy - what a brillant update! Love the pattern - simply fabulous! Thanks so much for linking to the Sunday Showcase - I greatly appreciate it. I'll be featuring this today. Hope you have a wonderful week ~ Stephanie Lynn
ReplyDeleteThis is so innovative and awesome!
ReplyDeleteYou did such a great job on this! So sad about the Windex though... I wonder, maybe a clear coat over the frost spray would work?
ReplyDeleteI may have to copy this on a small mirror or even a window and see how it turns out!
Thanks for the post!
This is just what I've been looking for! When you walk into my house, there are four large mirrored closet doors (1980). I've been looking for a way to 'soften' the look without replacing them. However, since they need to be cleaned often since they are opened and closed frequent. Do you have any ideas on how to make the 'frosting' permanent so glass cleaner won't affect it? Thanks for the great idea! Sue Orlando, FL
ReplyDeleteHi there! I know this is an older post but your cleverness is the best idea for my brass framed mirrored closet doors. What did you do with the brass? If I am reading your post correctly, did you spray paint the brass frame and door guide white? How is it holding up?
ReplyDeleteThank you!
I saw someone who did this same thing but using transparent contact paper instead of spray paint. I had to try it myself on a bathroom window and it works like a charm. You can clean it with windex without any problems and if one of the shapes get a little scraped up (think kids) you just cut out another and replace it. Just thought I'd throw that out there since it's no fun spending lots of time on something that can be (accidentally) undone in no time flat :)
ReplyDeleteWhat a beautiful pattern! At first look without reading your thread, I really thought it was store bought. Amazing work! A walk-in closets Bergen with this kind of door would be a dream come true for me. Thank you for this inspiration.
ReplyDeleteThanks! I wish I were lucky enough to have walk-in closets. That would be beautiful!
DeleteHello, did the spray on the frame last?I want to paint mine white but not sure if its going to be a waste of time. thanks!
ReplyDeleteMine has help up well over the past couple of years. They still look like they did when I first painted them.
DeleteCan you seal the frosted paint with anything that will help make cleaning them easier?
ReplyDelete