

If you're joining us for the first
time today, welcome! This is day 23 of a 31-day series about how to give a room in
your home a brand new look, from top to bottom, completely DIY.

I don't see what the big deal is . . . they make the bed look nice. {hee, hee} They do! They make the bed look nice! Just forget about those two lost days a year. What were you going to do with those two days anyway?
I'm all about ruffles -- especially in a girly room like this one. So I decided to make a big-ish pillow {18-inch square} with a couple of ruffles down the center front. I got the idea from the same picture I pinned on Pinterest that inspired yesterday's bow pillow. Alas, there were no directions for the ruffle front pillow so I had to wing it. Nice thing about pillows is they're squishy, so if the cover comes out wonky the pillow can usually be made to fit. Here's what we're going for today:

I used two contrasting fabrics, but you could do both ruffles the same if you wanted and just use one fabric. Or you could use three different fabrics and make both of your ruffles different than the base fabric. I used an 18-inch pillow form so here's what I cut out:
- {2} 19 inches square pieces of the base fabric
- {1} 25-inch by 37-inch piece for the biggest ruffle
- {1} 9-inch by 37-inch piece for the narrow ruffle
Next, take the fabric for your big ruffle, fold it in half right sides together and sew the two raw edges together with a 1/2" seam allowance. You'll be creating a long tube of fabric. Turn the tube right side out and press it flat with the seam down the center.
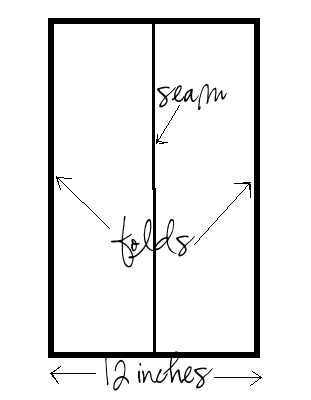
Follow the same process with your smaller ruffle piece. {I didn't have enough fabric to make a "tube" for my smaller ruffle, so I just cut a piece 5-inches wide by 36-inches long and made a narrow rolled hem to finish each long edge. I would have preferred using the "tube" method because then you wouldn't see the wrong side of the fabric on the back of the ruffle. I think it makes for a nicer finished product, but we make do with what we have, right? }
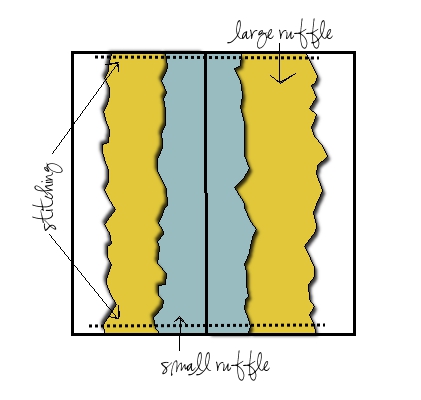
Once you have both ruffled pieces sewn onto the front of your base piece, stitch the top and bottom edges of the ruffle down to the base fabric.
Have a great day! I hope you'll come back tomorrow to FINALLY see how our Anthropologie knock-off Rivulets bedding turned out. It's a stunner!!


I love your colors and the ruffles are adorable! Thanks for sharing.
ReplyDeleteIt is a beautiful pillow
ReplyDeleteI've joined here for the first time and really enjoyed been here. I think that pillow design is totally cool and overall it's a cute pillow. Love the video clip and it's inspiring to have fun through chopping favorite pillows!! Thanks.
ReplyDelete