Be the first to see what I've been up to! Follow My 3 Monsters on Facebook, Twitter, Google+, and Instagram.
Hi guys! The interior shake-up continues in our home. When I get tired of something {our house} and I can't afford to fix what's really bothering me {by knocking down walls and such}, I tend to find a bunch of other little diversions. I can't remodel my kitchen/dining room anytime soon, which is what I would REALLY like to do, but I CAN add a little bit of cottage-y vibe to the space with some new thrifted accessories.
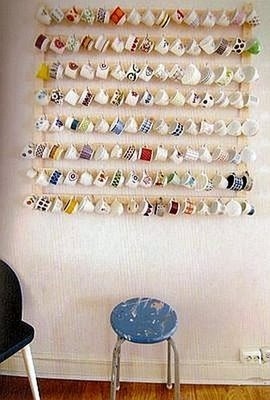
It was one of those love-at-first-sight, heart beating faster type decorating moments. What? You don't have those? I don't even know why I loved it so much. I'm not a tea drinker, for goodness sake! But I knew on the spot that I would one day try to replicate that in my home. I had the perfect spot in my dining room that was crying out for something more interesting than a chalkboard leaned up against the wall. For quite a while now I have been collecting cute or interesting tea cups from thrift stores, with just this project in mind. Several times my husband, the clutter sheriff, has asked me if we needed to keep "all these odd cups" or if he could donate them. I persevered and kept collecting. Finally, I hit the jackpot at Goodwill, where I found about 20 really great tea cups and mugs in one trip, and I knew I was ready to take the plunge!
I tried to get a good combination of plain and patterned, white and colorful, feminine and masculine.
Brent's fear was that it would look like a "grandma's house", so I tried to get a good mix of vintage and modern as well.
Here's a perfect example of him and me, side by side -- a rustic carved bamboo cup next to a girly turquoise and gold leaf one. I think the juxtaposition makes them each more beautiful.
To hang them I used 1 X 2 inch wood slats that are super inexpensive at Lowes or Home Depot, and medium-size cup hooks. We cut the wood slats down to 30 inches in length, then drilled small pilot holes and inserted cup hooks 4¼ inches apart. We hung the slats on the wall 5½ inches apart by screwing them into the studs in two places per slat. This way I only ended up with 12 holes in my wall, not the 42 holes I would have had if I attached the cup hooks directly to the wall. That will make it easier to remove if I ever get tired of it!
To give it a nice, finished look, countersink the screws into the slats so you can cover the holes with wood filler. After sanding and painting you won't even be able to tell where the hardware is. The hardest part of this project was removing all the price tags from the cups -- I worked on that for a good long time, while the wall hangers came together in about 30 minutes or so.
It's interesting how such a simple, cheap project has made me love my dining room again. Temporarily. It still needs a wall knocked out. Just sayin'. Have you ever had a simple project in the works for a long time that paid off in spades when it finally came to fruition? There's something really satisfying about that!


Have you ever used this stuff?
ReplyDeleteHomemade Goo Gone
1 part vegetable oil
2 parts baking soda
Stir together until paste is formed. Then, use a paper towel or your fingers to apply. Work the mixture into the residue until it releases from the surface.Wash off with soap and warm water.
Wondering if it would help get price stickers off the cups for anyone else who wants to do the project . . . I used it to get the sticky residue off a de-labled plastic bottle. Worked like a charm!
Thanks Sarah! I bet that would work great. I ended up using my hand-held steamer, which worked like a charm, too. I didn't think of getting out "tools" to help until I had struggled for a while, though. Sometimes I'm not so smart.
DeleteI love this tea cup decor. It is clever and charming.
ReplyDeleteI remember seeing that picture on pinterest as well. How cool that you actually made it! It looks fabulous.
ReplyDeleteI would be thrilled if you could share this post at my weekly Say G’day Saturday linky party. It has just started and this would be a brilliant addition.
Best wishes for a great weekend,
Natasha in Oz
Thanks ladies!
ReplyDelete