My 3 Monsters: April 2012

Recent Posts

4.30.2012

Monday Freebie

Oooh!  I told you this week was going to be good, didn't I?!  Have I got a deal for you!!  
 Have you heard of One King's Lane?  I'm sure many of you already have.  IF NOT, you're gonna' love it!!   In their own words, "Simply put, One Kings Lane is an elegant, curated online sales site. We bring our members a spectacular, hand-picked selection of top-brand and designer items at up to 70% off suggested retail prices."  If you haven't already registered with the site, all you have to do is head on over there and create an account.  Just for doing that, they'll give you a $15 credit to spend on anything you want on the site!!  Did you hear that?!  $15 to spend however you want, just for signing up.


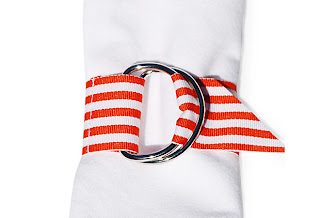
You could get a set of 6 of these pretty napkin rings {available in multiple colors} FOR FREE.


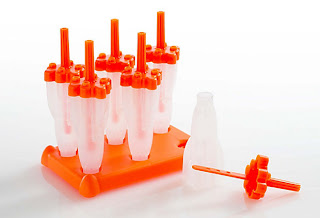
Or maybe you'd prefer some TOTALLY FREE rocket shaped popsicle molds?


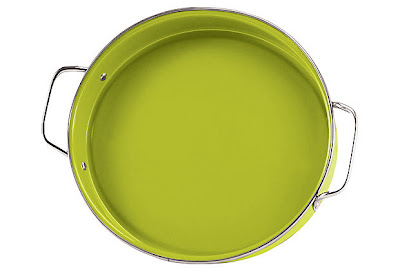
This powder-coated stainless steel serving tray is cute, too.  Did I mention it would be FREE?

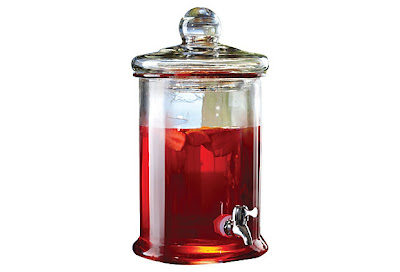
If you're feeling like a big spender today, this 5 Liter glass beverage dispenser would only set you back $5.

All you have to do is pay shipping on your purchase.  The Summer Entertaining sale at One King's Lane ends Thursday morning so you have to act fast to get these items.  Don't worry if you miss it, though.  They have new sales starting all the time.

I took advantage of this deal about a year ago when another blogger wrote about some super cute baking dishes that would be free at the time.  I was thrilled because I'm a cheapskate at heart and I love to get things for free.  When I saw these fun things today I just knew I had to share with all of you!  And now I'm in the mood for a barbeque. {Imagine all those cute things, some white dishes, paper lanterns in the trees out back, soda in vintage bottles chilling in a galvanized tub, ribs hot off the grill, and a bunch of good friends. . .  oh man. It's summer!!}

**I am not being compensated by One King's Lane for writing this post.  They do offer me a site credit for every purchase made from my referral, which means we both win!  I've just been really pleased with my experience with this site in the past an wanted to share it with you.**


4.29.2012

This Week's Scripture Post-Its {Free Printables}

UPDATED 11/21/2015:  I have combined all the Scripture Post-its pages, downloads, and printing instructions into one convenient location here.  Hope that makes it easier for you to find everything you need! 

Do you guys think of Sunday as the end of the week or the beginning?  I'm never quite sure.  It's a day that just lives in limbo to me.  For me, today, it's the beginning of a brand-new, awesome week.  I just know it!  Our 16th anniversary is coming AND we're having our big fundraiser Friday evening. We're about 90% sold out in the theatre, which is unbelievable to me.  Between ticket sales and the donations we have received, we will be sending to Riley to camp this summer and making a sizable donation to the American Diabetes Association.  Plus we get to see a fun movie in a private theater full of all of our friends.  Win, win, win!

Enjoy!  Have a great week, everyone!

4.28.2012

Mother's Day Quote {Free Digital Printable}

Hi there everyone!! I'm so very glad that it's the weekend again. Brent and the boys Redboxed some movies tonight so I had some uninterrupted computer time.  I'm not gonna' lie -- it was just what the doctor ordered tonight!  I've had an idea floating around in my head for a little while now and just haven't had time to sit down and work it out.  Plus, I've been stressing over learning how to use some different social media sites this week.  Why am I so dumb about that kind of stuff?

Anyway...As you all know, I've been a little obsessed with the chalk art of Dana Tanamachi lately.  I love it.  Like, really, I would marry it if I wasn't already married to the man of my dreams {16 years next Friday, folks!}.  So I wanted to do up a little quote for mother's day as an homage to Dana.  I'm pretty pleased with how it came out.


This one here is scaled to be printed as a 5x7, if you are so inclined to do so.  I've also made the image in an 8x10,  a 16x20, and a 20x30 poster size.  Those files are available on the new My 3 Monsters Facebook page.  You'll have to Like the page to "unlock the exclusive content" -- how dorky do I sound?!  I'm just hopelessly uncool, BUT...these free digital printables are pretty hip, if I do say so myself.  Let me know if you can't get in there to get them.  Head on over to My 3 Monsters on Facebook to see if I did my homework right!

Have a great weekend.


It's OVerflowingLil\'Luna

4.25.2012

Why We LOVE Camp AZDA

This is our son Riley.

He's a pretty great kid -- at least we think so.  He likes running, music, video games and making movies with his siblings.  As many of you know, he was diagnosed with Type 1 diabetes when he was in kindergarten.  Wasn't he sweet back then?

Actually, he's still pretty sweet -- just a little bit bigger now.

Last summer he had the opportunity to go to Camp AZDA, a local diabetes camp, for a week.  It was a life-changing experience for our whole family.  We had heard about diabetes summer camps.  Our doctor and several friends who grew up with diabetes recommended we send him, but I always brushed it off thinking, "That's just not for us," or "My kid will be fine without that."  And I was partly right.  He would have been fine without it, but who wants their kid to just be "fine" instead of really thriving?

The only reason I even considered it last year was because the family of another diabetic girl at Riley's school offered him a "scholarship" to the camp.  They, through their fundraising efforts for The American Diabetes Association, had earned a free trip to camp, but their daughter was a little too scared to go.  They really wanted Riley to have the chance to take her place.  How do you say no to kindness like that?  So he went.

Honestly, I think he was a little nervous himself.  I know I was nervous to see him go.  He came home a week later a changed kid.  It was such a good experience for him to meet other kids who are in the same boat -- his people, as he called them.  For the first time in a long time he wasn't the only one who had to stop what he was doing every little while to check his blood sugar or figure out his carbs before he could start eating.  I think it was liberating for him in a weird way.  It was also good for him to see just how good he really has it.  Many of his new friends had been hospitalized several times or had seizures on a regular basis.  Riley hasn't had to experience any of that, thank goodness.

I also think it was great for him to meet his camp counselors, who had juvenile diabetes themselves.  They were a bunch of really cool guys in their early twenties who did everything cool -- travel the world, skateboard, etc. {whatever else a ten year old boy would think was awesome in life}-- even with diabetes.  I think it gave Riley hope that life was going to be great for him, even though his condition wasn't going away.

It was also just plain old fun!  They had cool activities everyday like horseback riding, swimming, rock climbing, sports, crafts, and the smashing of said crafts on rocks {even though he didn't take pictures of any of those things}.  AND there was a big dance party every night.  Riley is just getting to the point where he craves a little independence, but he has this "thing" that keeps him tied to his parents.  I completely understand that it is frustrating at times.  Having a fabulous med staff at camp to take care of his insulin pump infusion set changes and stuff allowed him to have a little freedom for a while.

It was rejuvenating for Brent and I as well.  I'm not gonna' lie, taking care of a diabetic kid is a whole lotta' work.  It's just a part of life for us now, and we really can't complain, but I didn't realize how nice it would be to not have to do it for a couple of days.  He learned all kinds of new skills while he was there that continued to make life easier long after he came home.  The best part -- his blood sugar numbers were better at camp than they had been in years and continued to be for some time.  There is nothing like sending your kid to live with an endocrinologist for a week to fine-tune all your insulin pump settings.  It was awesome.

Long story short, we HIGHLY recommend diabetes camp to any family raising a kid with diabetes.  Camp AZDA is absolutely fantastic, but I'm sure there are great camps across the country.  {If you're interested, look on the ADA web page to find a camp near you.}

In march this year we "celebrated" the 6th anniversary of Riley's diagnosis.  We decided as a family that we would like to start a tradition of holding a fundraiser for the American Diabetes Association every year to commemorate his life-changing diagnosis.  This year we have rented out a local movie theatre to have a private screening of The Avengers on opening night!  We're really excited about gathering all our friends
{old and new} to support such a great cause.  Here's the info:


If you're local and interested in joining us, we'd love to have you!!  It's probably a good idea to call and pre-order your tickets.  We have already filled well over half of the seats.  {Hooray!} Thanks for listening to my little plug for the ADA today.

4.24.2012

How to Paint a Houndstooth Pattern {No Stencil Required!}

I have long been a fan of the houndstooth pattern.  I like it on clothing and in home dècor.  It's super trendy right now, but it is a pretty classic design -- it's been around forever.  I'm still secretly coveting a black and white houndstooth coat I saw several years ago.  *sigh*

Anyway, maybe I'm the only dummy who hadn't realized until recently how simple the pattern really is, if you break it down into a grid.  Am I the only one?  Seriously.  Take a look at this:

It's just a series of solid and striped squares.  It's a little difficult to see in that graphic there, but that is all it takes to create a houndstooth design.  Look here at my painted powder room rug:

Can you see it now?  You don't even need a fancy-schmancy stencil or nothin'.  Just some good old painters tape and gumption.  {A stencil would really be a whole lot faster, but I'm just a big cheapo and I already had painter's tape on hand.} Start by laying out your grid and taping off the black squares.

Paint those squares and remove the tape.  Once paint is completely dry, tape off the squares directly to the left of the black ones.  Then, use some more tape and tape off the two diagonal stripes within the squares.

Paint the stripes and allow to dry.While we wait for those to dry, allow me to apologize for the bad cell phone photos.  I decided to work on this project at 11:30 one night, only to discover that my "good" camera was dead.  So, what would have been bad pictures to begin with are now almost comical.  {And edited to within an inch of their lives.}  *whistles awkwardly*  There.  They should be dry now.

Remove that tape and then repeat that step for the squares directly above the solid black ones.  I had given up on the picture-taking at this point, but this step looks a whole lot like the last one.  Be sure to pay very close attention to the pattern here.  You paint the opposite stripes in these squares than you did in the previous step.  Does that make sense?  In the last step you painted the first and third stripe within the square.  This time you'll be painting the second and fourth stripes.  Got it?  Sweet.  Peel that tape off, let the paint dry again, et voila!  Beautiful houndstooth pattern, super easy. 

Obviously this works on a sisal mat, but it would also look great painted onto a piece of furniture or an accent wall in a room.  I'm considering painting my small hallway at the top of the stairs in a tone-on-tone houndstooth pattern, using flat and gloss versions of the same color.  I think it would catch the light just enough to catch your eye without being overwhelming.  Yep, I just talked myself into it.  Watch for that project soon!  I'm still trying to get that post about Camp AZDA and our fundraiser ready -- hopefully tomorrow.  See y'all soon.

4.23.2012

Two Ingredient Root Beer Float Ice Cream

You know how last week I told you about our Family Night tradition?  Remember -- Short and Sweet, with a Big, Big Treat?  Well, this week was a fun one.  We had the missionaries from our church and Sis's best friend over for dinner and Family Night.  I was feeling a little lazy {I've had a headache all day -- boo!} so I didn't want to cook a dessert, but we needed something super-yummy for this special evening.  That's the deal right?  Big, Big Treat.  I may have been lazy, but tonight's treat did not disappoint.  Homemade Root Beer Float Ice Cream.  You heard me.


All you have to say is "homemade ice cream" and people are instantly impressed, but really, it couldn't be easier.  Just two ingredients and about two minutes of work is all is took to delight my family and friends.  Dump a 2-Liter bottle of root beer {whatever brand you prefer}into the canister of your ice cream maker.  Then dump in a can of sweetened condensed milk.  You don't even have to stir those two ingredients together.  Freeze it in your ice cream maker according to your machine's directions. Boom.

Ours spun in the machine for about 30 minutes, but it didn't stop like the machine is supposed to so we checked it at that point and it was just about perfect.  I think because the mixture ends up to be more of a sherbet consistency it wasn't thick enough to stop the spinning.  {But don't quote me on that.}  We took it out of the ice cream maker and left it in our freezer for several hours before serving to set up a little more.

It was really yummy -- perfectly light and sweet -- and so inexpensive!  Think of all the flavors you could try!  Orange soda = Creamsicle.  Grape soda = Purple Cow.  Vanilla Coke = Coke Float.  Mmmmmmmm.  This will probably make several repeat appearances at Family Night before the weather cools off again.  In November.  Come back tomorrow for some info about our fun fundraiser.  Have a great day, friends.


Lil\'Luna

4.22.2012

Scripture Post-Its {Free Book of Mormon Printables}

UPDATED 11/21/2015:  I have combined all the Scripture Post-its pages, downloads, and printing instructions into one convenient location here.  Hope that makes it easier for you to find everything you need! 

Here is this week's installment of scripture post-its.  Enjoy!  {Click the link underneath each image to download.}


I have more fun projects in the works this week.  See you again soon!

4.21.2012

Scrappy Rosette Pillow Covers


You may remember these Valentine Pillow Covers I made a while ago:
I loved them, but I learned a valuable lesson when I washed them.  Don't ever use the the less-expensive store brand iron-on transfer paper.  EVER!  I followed every direction to a tee, but once I washed the pillow covers the transfers started cracking and peeling.  That has not happened {in my experience} with the name brand paper.  They were pretty ugly, but I liked the basic white covers a lot so I attempted to salvage them.

I could kind-of scratch the design off with my fingernail, but that was taking forever.  I looked around for something that might be faster.  Sandpaper?  That worked OK, but I was a little overzealous and started wearing a small hole in one cover.  This next option might sound wierd but it worked really well --a Ped-Egg.  I remembered the commercial I had seen a gajillion times on TV where they Ped-Egged the surface of a balloon without popping it.  These pillow covers were canvas -- much more durable than a balloon, right? I lightly rubbed the Ped-Egg over the surface of the pillow and it shaved the transfer right off.

There were just a few spots that I couldn't get all the way off and that one pesky little hole I had rubbed.  I decided I could still use them if I just turned that side to the back when I set them on my couches.  That idea worked in theory, but my family really lives in this house and the pillows showed the ugly side as often as not.  I wanted to come up with something to cover up the "scarred" areas, but I just didn't know what.

We lived with those not-super-ugly-but-not-pretty-either pillows for a couple of months until it came to me: Rosettes.  In bright, fun colors.  Just a smattering across the front of each pillow would be perfection for the spring and summer months.  I grabbed my fabric scraps and made rolled rosettes, pinning the fabric to the pillow cover as I went.  Once I had the layout I liked, I sewed the rosettes to the covers by hand, poking my fingers too many times to count in the process because I kept forgetting there were pins everywhere.

 I thought about using the free-motion feature on my sewing machine to attach the rosettes, but I've never used that before and I didn't want to mess the covers up.  Again.  I LOVE the way they turned out:


They pick up on all the colors in my geometric canvas and tie in the Mermaid blue coffee table.  Plus, they just make me happy, all bright and cheerful like that.  Cassie {our dog} has already adopted one of them as her sleeping pillow.  {Yes, our dog likes to sleep with her head on a pillow.  It's cooky.  At least she has good taste, right?}  Have a great weekend, everyone!


UndertheTableandDreamingLil\'Luna

4.20.2012

Coconut Drippy Cake


We have a Family Night every Monday evening where we {duh!} spend time as a family.  Usually we coordinate weekly schedules, have a little spiritual lesson and then have dessert while we play a game.  We've been lucky so far that our kids participate eagerly.  And if not eagerly some weeks, at least willingly.  I know it's difficult to give up homework time {or friend time, or computer and tv time} to make room for family time so our family philosophy on Family Night has always been

"Short and Sweet with a Big, Big Treat".  

Our kids respond well to that.  But I'm telling you, it is hard to come up with a fun treat every week.  Especially in Arizona in the endless summer when it's too hot to eat anything warm or heavy.  That's why I'm kinda' partial to COOL WHIP Whipped Topping.  There are so many really yummy things you can do with it.  We like COOL WHIP mixed with instant vanilla pudding as a filling for crepes -- topped with fresh strawberries and another dollop of COOL WHIP they are heavenly!  Strawberry Shortcake is another family favorite.  The more COOL WHIP, the better.

One time, when I was really busy and forgot to make a treat for Family Night, I scooped frozen COOL WHIP straight into bowls and we ate it like ice cream with a little bit of caramel sauce and some mini chocolate chips.  That was delightful.  Just sayin'.  Even my husband who doesn't like "fluffy stuff" will eat COOL WHIP.  You can't beat that!

Some of my all-time favorite recipes are cakes that use COOL WHIP instead of frosting.  My Jello Poke Cake is always a crowd-pleaser {how have I never shared the recipe here on my blog?!}, as was my Minty Boston Cream Cake this year.  Well, this week I wanted to try something new and I lucked into this recipe for Miss Valerie's Drippy Cake at Big Red Kitchen.  It's really similar to Poke Cake in that you bake a yellow cake then poke holes in the top of it and let it absorb some kind of delicious liquid as it cools.  In this case the delicious liquid is a mixture of sweetened condensed milk and cream of coconut.  I know, right?!  

Coconut Drippy Cake
{from Big Red Kitchen}
yellow cake mix {prepared according to package directions in a 9x13 pan}
1 can {14.5 oz.} sweetened condensed milk
1 can {about 15 oz.} cream of coconut -- I found this on the alcoholic drink mixers aisle in a 21 oz. bottle
1 container COOL WHIP Whipped Topping

Bake cake according to package directions.  When it comes out of the oven, poke holes all over the top of the cake with a fork.  Mix sweetened condensed milk and cream of coconut in a bowl and pour over the cake while it is still warm.  The coconut yumminess will seep into the cake as it cools, making it super-moist and delicious.  When cake has cooled completely, frost with COOL WHIP and chill in the refrigerator until ready to serve.  The longer it chills, the better it gets.  In fact, I thought it was way yummier the next morning for breakfast.  Yes, I sometimes eat cake for breakfast.  Don't judge. 

I thought this would be good with a layer of crushed pineapple on top before the COOL WHIP layer, like a piña colada cake or something.  Maybe next time . . .   Have a great weekend, friends.  I'd love to hear what you'll be baking for your family!

Sponsored posts are purely editorial content that we are pleased to have presented by a participating sponsor. Advertisers do not produce the content. I was compensated for this post as a member of Clever Girls Collective, but the content is all my own.


UndertheTableandDreaming

4.19.2012

{Couldn't Be Easier} Mason Jar Lamp Makeover

I showed you this little, funky lamp makeover in my powder room last week, but I wanted to share with you just how easy it was.  I've seen a billion mason jar chandeliers and light fixtures on Pinterest, and maybe you have, too.  So much so that someone created this version of the popular {and hilarious} Hey Girl meme:


I'm not really opposed to bandwagon-crafting, but it always seemed like they would be hard to make or require special tools or something.  To be honest, I only ever looked at the pictures and didn't read the tutorials.  Maybe if I had done that I wouldn't have been so leery of them.  Here's what you need:

{I hope I'm not confusing you with my super technical vocabulary. ☺} I had a few vintage zinc canning lids left over from the soap dispensers I made at Christmas so I used those for my lamp.  You could probably use any canning lids you have handy -- in fact, I think it would look cute to spray paint the standard aluminum lids a bright fun color.  You want to start by making a hole in the top of the lid big enough to fit over the bulb housing on your lamp.  I made a hole in the center with a nail and then used my needle nose pliers to pull back the metal and open it up wide enough.  Use a hammer to flatten the pulled back metal on the inside of the lid a little bit.
Obviously it doesn't have to be perfect.  Just make sure that you can't see any rough edges when it is in position on your light fixture.  Next, you attach the mason jar lid to the light fixture using the flange thingy that held on the glass shade that originally came with the fixture.  This is what I'm talking about:
You just put the lid up over the bulb housing and screw the flange thingy onto the threaded part of the bulb housing.  Tighten it up so it keeps the canning lid in place, like so:
At this point you want to screw in the candelabra bulb, if you haven't already, and then screw the mason jar up into the lid.  Easy cheesy!
I don't know if I'd go so far as to say it looks like a million bucks, but it is quirky and fun.  It's a really inexpensive way to add some interest to a builder's grade light fixture.

Have a great day!


4.18.2012

Trifold Notebook Covers


Last weekend as I was blog-hopping I came a across an idea for which I could hardly contain my excitement.  Amy over at Ameroonie Designs shared a tutorial for some awesome Personal Progress Book Packets.  I knew instantly that I had to make them for all my Young Women.  All 21 of them.

Good thing they were easy!  And cheap -- each packet only uses 1 & 1/2 fat quarters of fabric.  Fat quarters happen to be on sale for $1 this week at Jo Ann so each one only cost $1.50!  I had all the ribbon and some thin quilt batting {which I used instead of the felt} in my stash, but if I had needed to purchase that they would have been about $2.00 each.  Not too shabby!  They were fun to make, too.  No two are exactly the same -- just like my young women!  As I was making these for the girls yesterday I thought I should make them for all the leaders, too.  They would be perfect for holding small notebooks or other things you may want to keep organized in your purse.  They could even be made to hold a Kindle by adjusting the measurement a little!

These are what my girls will getting for their birthdays this year -- except they'll all get them tonight at our IHOP Night for mutual.  What is IHOP Night?  I'm so glad you asked!  IHOP stands for Important Hour of Progress {in this context, anyway}.  We have a pancake dinner and then the girls all hunker down and work on their value experiences or projects.  The leaders are there to help, but it's a super great opportunity for the Laurels to help the younger girls and earn their Honor Bees in the process.  We try to have an IHOP Night every quarter, more or less.  Anyhoo . . .

Losing Personal Progress books and journals has been a big issue in our ward.  No one seems to have them . . . ever.  I'm hoping maybe this will help.  We've also been encouraging the girls to use the church's online program so I might make little card where they can record their log-in information to stick down in one of the pockets, too.
I know most girls don't have hope chests anymore, but I think this would be a cute way to store all their Personal Progress stuff once they've completed the program and earned their medallion .  That way they can tuck it away and share it with their daughters someday.  Am I dreaming?  Whatevs.  A couple of the girls came over and saw me working on the packets yesterday and got really excited about them, which makes all the work worthwhile in the end. Thanks a ton to Ameroonie Designs for the fabulous tutorial!  {I'm gonna' be a hero tonight because of you!}


Lil\'Luna

4.17.2012

Hand Painted Geometric Canvas Project


I got bored the other evening and started poking around in my craft closet for something to make or do.  Among other things, I had some old beads, a lot of scrapbook paper, an unfinished sewing project, and a 16x20 canvas with a small hole poked in it.  Blah!  But then I remembered an idea I had seen on The Pleated Poppy blog a while back.  I carefully inspected the canvas and decided that it could possibly be repaired with some duct tape on the back, so I got to work.  As I was setting up shop on the kitchen table, my husband asked me what I was doing.  "Making a painting," I told him.  {I could probably have just said, "Painting," but that's not how I talk.}  "For what?" he asked.  "For our home . . . ," I replied, with a giant DUH in my voice.  "OK . . .," was all he said, but his tone of voice said, "I'm just going to humor you for now."

I was undeterred.  And I was right about patching the canvas -- after the base coat of paint you couldn't even tell where the hole had been.  Click here to see the inspiration project and read the great tutorial.  Here's how mine turned out:

I love the fun, bright colors and the geometric pattern.  It really "pops" against the more cottage-y decor in the room.  I kind of wish I had left a few more unpainted areas, like in the inspiration project, but other than that it's exactly what I wanted.  I hung it right outside my new blue powder room and I really like the way it picks up on that color and brings it into the living room.  Now, guess who loves it?  That's right, the hubs.  Vindication is so satisfying.  More fun projects tomorrow!

Related Posts Plugin for WordPress, Blogger...