My 3 Monsters: February 2014

Recent Posts

2.28.2014

Lace Embellished Tank Top

Lace Embellished Tank Top at /
 Hi guys!  Today I'm sharing one of the easiest projects I have ever made -- my Lace Embellished Tank Top. In fact, taking pictures of this finished top was WAAAAAAY harder than actually making the top.  I was using my webcam to take a selfie -- while sucking in my gut and trying not to pass out -- and that grainy photo up there was the best of the 9,000 or so that I took!  Whatever.  You're here to learn how to embellish a tank top, not take a selfie, so let's get to it!  {If you're here to learn how to take a selfie, you'll be sorely disappointed!}

Lace Embellished Tank Top Tutorial

Supplies:
  • plain tank top {pre-washed so it won't shrink after the lace is applied -- mine was $4 at Walmart.}
  • lace applique {I got mine from Wholeport -- they have an awesome selection for great prices.}
  • washable permanent fabric glue

Step 1: Place the applique.  Put on your tank top and hold the lace up to the neckline to decide where you want to place it.  The shape of this specific applique followed the shape of my tank top pretty well. Use several pins to hold the lace in place when you take the tank top off. 

Lace Embellished Tank Top at /

Step 2:  Adjust the lace to get a perfect fit.  When I pined the lace applique on to my tank top, it was a little too short to reach the top of the strap.  It was also a little wider than my tank top strap, so I cut out a few of the flower shapes that were hanging off the edge and moved them to the top.  Pin those pieces in place, too.

Lace Embellished Tank Top at /
Step 3:  Attach the lace to the tank top with fabric glue.  Make sure you get permanent glue, not the kind that will wash out. I tried this Flexible Stretchable Fabric Glue from Aleene's.  I had never used it before, but it said it was good for stretchy fabrics, so I thought it would probably work well.  Before you begin gluing, put something between the two layers of your shirt so you don't accidentally glue it together!  I used this old cutting mat that I have just for things like this.

Lace Embellished Tank Top at /

Starting in the center, gently pick up parts of the lace and put dabs of glue underneath, then press it down to attach it to the tank top.  I focused mainly on the edges and the big flowers.  Work your way from the center to the ends, removing pins as you go. The glue dries clear, so it's not a really big deal if you use a little too much.  I kept some paper towel close by to dab up any excess glue.  

Allow the glue to dry completely and you are finished!  I laid it out and let it dry over night to make good and sure it was dry.  Follow the instructions on your bottle of glue for washing -- usually you have wait a certain length of time for the glue to completely set before washing.

Lace Embellished Tank Top at /
I told you it was easy -- almost embarrassingly so!    I'm thinking about going back and getting a few more colors of tank tops to make some more.  For $6 each I can totally afford several of them.

Are you starting to get spring fever?  I'm all ready for pastels and thin sweaters for sure!

Happy Crafting!

Amy

This post contains affiliate links.

2.26.2014

Repurposing 101

About a week ago I taught a class to the women at church about Repurposing.  At first when I was asked to do it, I wasn't sure what to say.  I mean -- Step 1:  go to Goodwill or DI and buy something cheap, Step 2: make it into something cool.  Boom.  That's a really short class.  The more I thought about it, though, the more ideas kept coming to me.  I do actually have a kind of a system for what I will buy and what I won't.  I have a few places that I like to shop and a few items I always see that are no-brainer fixer-uppers.  I thought I'd share some of those ideas here with y'all, too.  To keep it interesting, I'll sprinkle in some pictures of repurposing and thrift store makeover projects I have done along the way.

Repurposing 101

I became a "repurposer" the day I married my husband.  I had just graduated from BYU one week prior to our wedding with a BFA in Interior Design and Brent was still a student.  He was working an on-campus part-time job and I was working my first design job up in Salt Lake.  We were pretty much broke and we had nothing.  {I don't know what we were thinking.  I guess we were young and in love and that's all that mattered at the time.}  Luckily, my parents had just purchased some new furniture so they gave us their old stuff as a wedding gift.  It was awesome because otherwise we would have been sitting on the floor just looking at each other a lot.  

Our first apartment was in the basement of an old house, so picture me -- young, brand new interior designer with a head full of ideas for the beautiful home I would have -- sitting down on my parent's old furniture in that yucky basement, wondering what I had gotten myself into.  My new-graduate-with big-dreams honeymoon ended as soon as my real honeymoon did.  I was undaunted, though.  I was determined to make that stuff we had into the stuff I wanted to live with.  And really, that's what I've been doing ever since.  I may never have a house full of brand new, really nice things in this lifetime, but what I DO have is a home that is comfortable {and kinda' cute, if I do say so myself} that is a really good reflection of our family. 

Two of my favorite saying are:

Use it up, wear it out, make it do, or do without.
It's not what you have, it's what you do with what you have.

Those are my mantras when it comes to decorating my home.  That and, "Maybe someday . . . "

Things That Are Readily Available and Easy to Repurpose:

We all dream of the "big score" when were thrifting -- that amazing dresser for $1, or the antique china hutch that no one will ever believe you thrifted.  Those are the "white whales" of thrifting.  If you find one, buy it on the spot and tell everyone you know because you deserve the kudos.  More often -- almost always -- you'll find less impressive things that are still really great repurposing buys, like these:

1.  Glass Jars and Vases -- Hello, mason jars!  If you've spent any time on Pinterest at all you know there a myriad of ways to use mason jars.  Paint the lids and add cool knobs for vanity or desk top storage.  Paint them with chalk paint and use as vases.  I replaced the glass globes on my bathroom light fixture with jars for a cottage-y look.


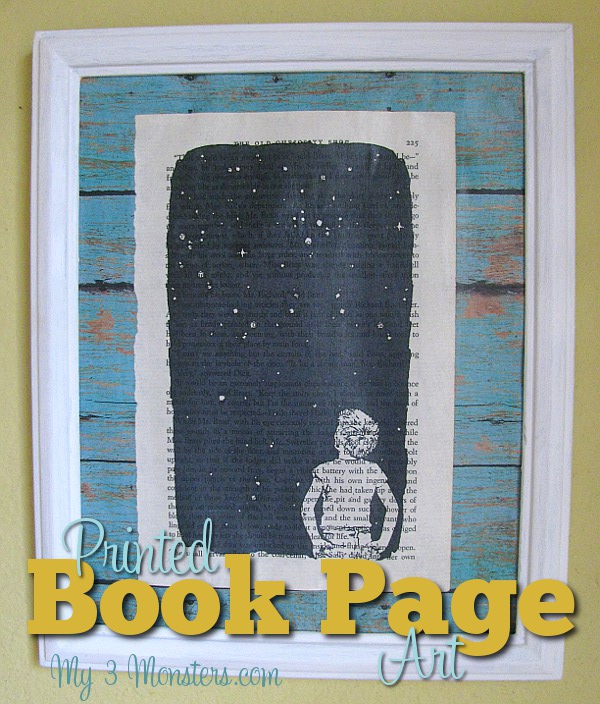
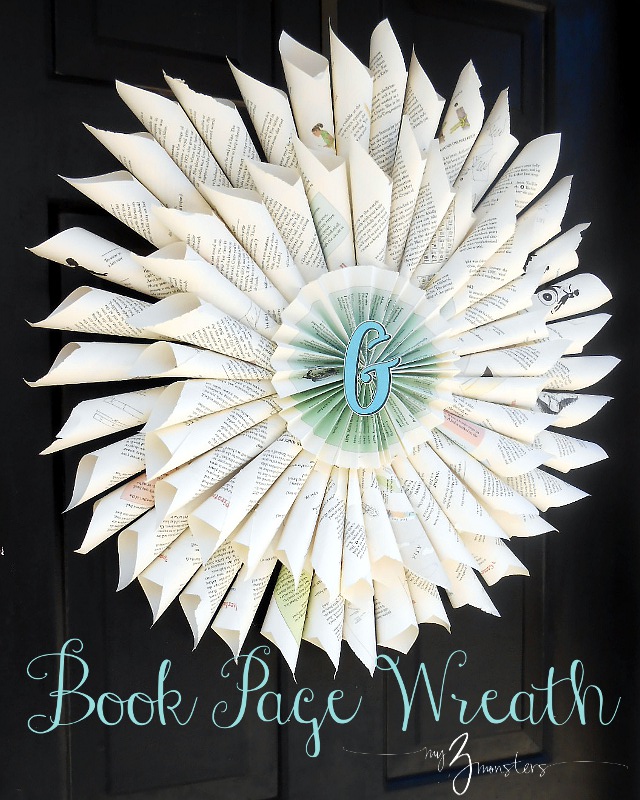
2.  Old Books -- The older and yellower, the better if you ask me.  Again, Pinterest can supply you with a million ideas for projects with old books.  Here are a few of my own:


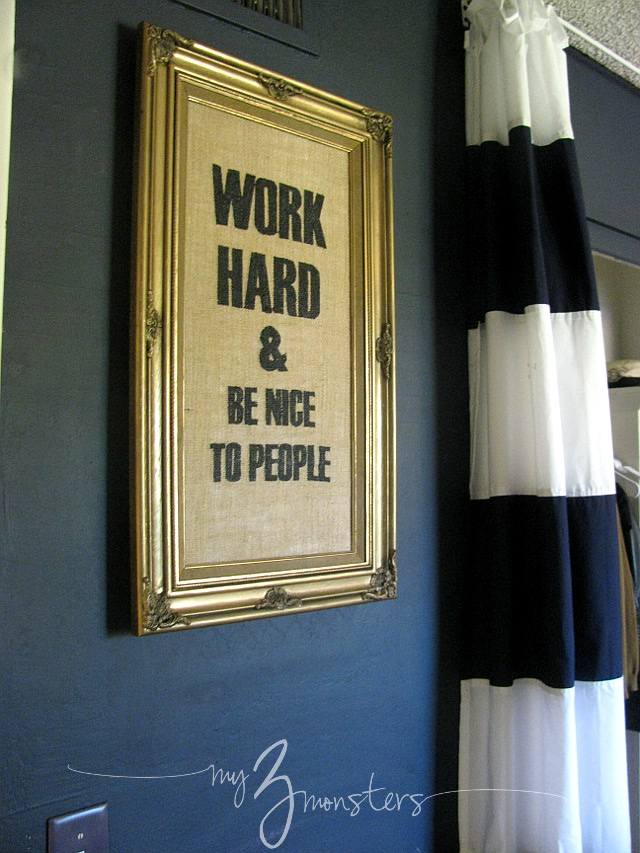
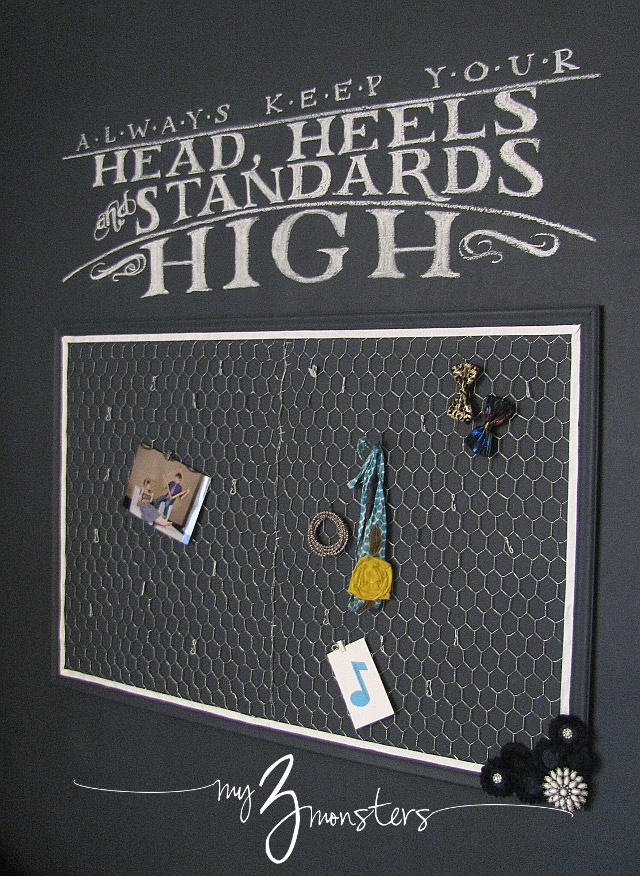
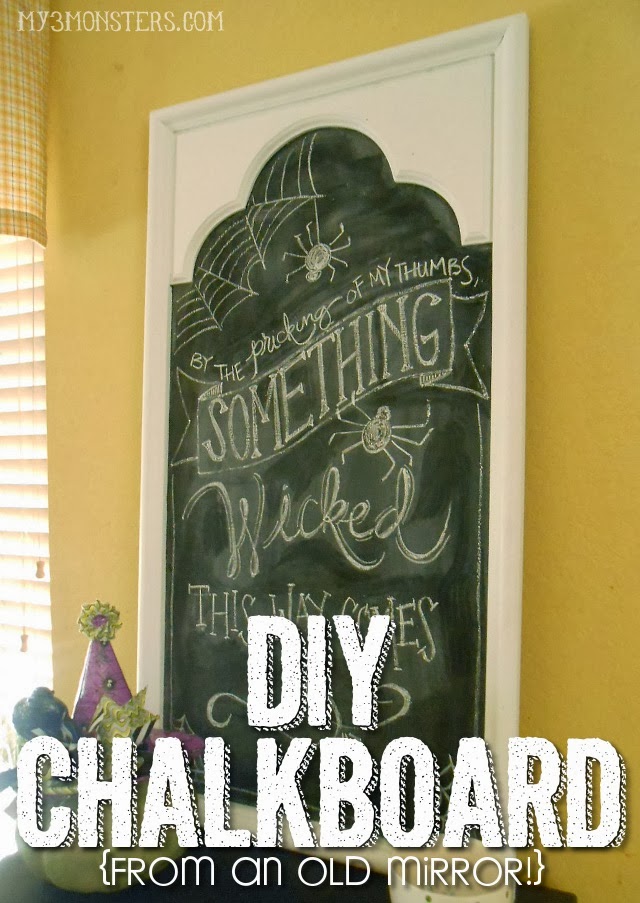
3.  Frames -- I'm not necessarily so good at "repurposing" frames, but they are some of my favorite thrift-store makeover items.  I love finding really cool frames that have neat details and repainting them to bring them back to life. My message here is that art doesn't have to cost a lot of money.  You can make stuff to hang on your walls that is perfectly tailored to your family.


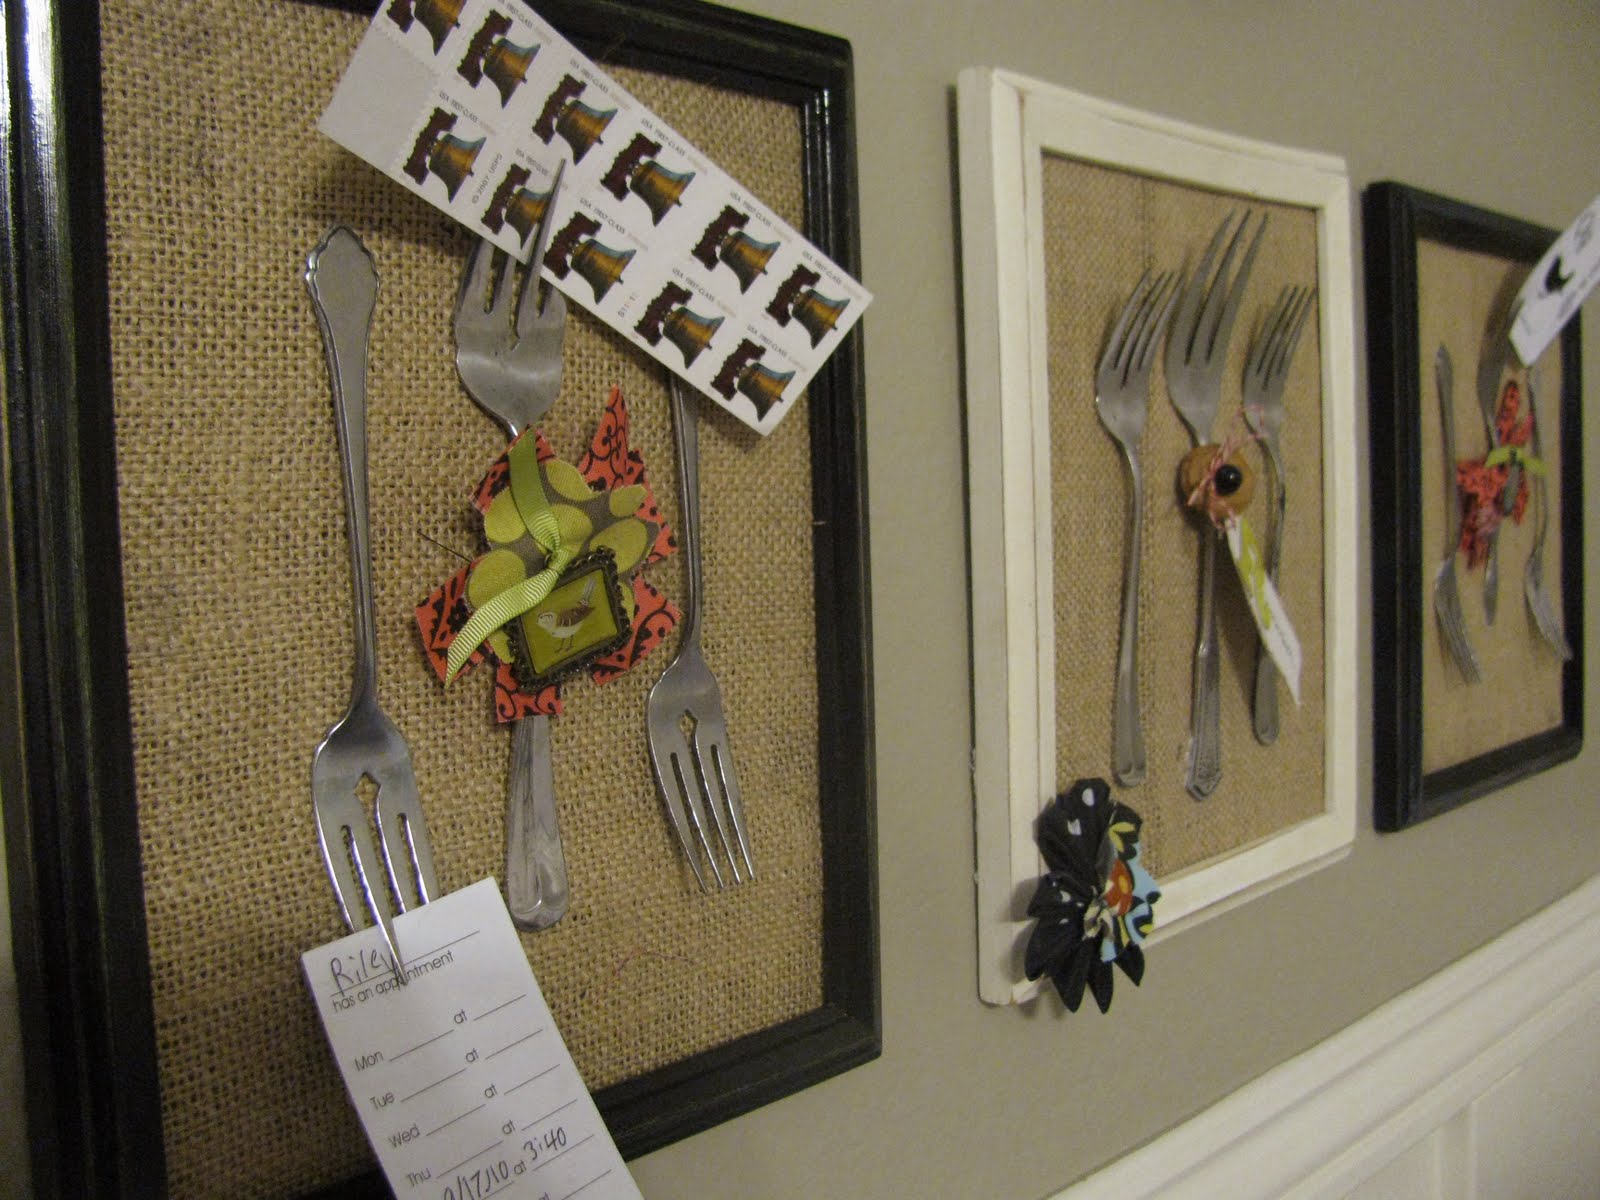
4.  Dishes and Silverware -- I'll hang a good-loking plate on my wall and call it art.  Nowadays, plate walls are all the rage.  Here are a few other things you can do:


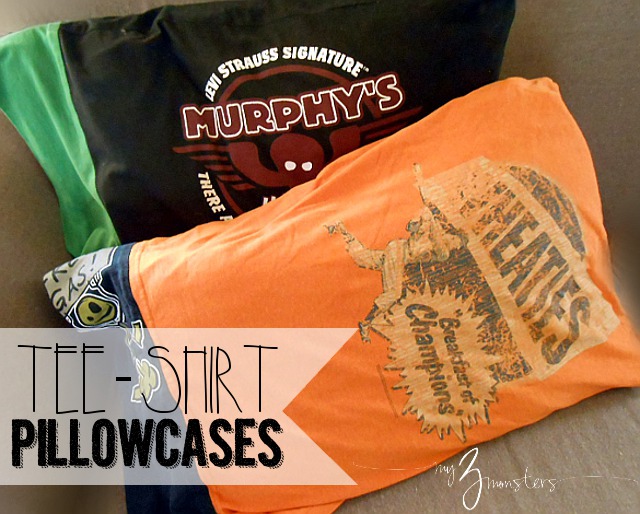
5. T-Shirts -- the bigger the better because it gives you more fabric to work with!


6. Furniture -- There will always be old furniture in the stores, but the good stuff is pretty hit and miss.  There are some really fun things you can do:


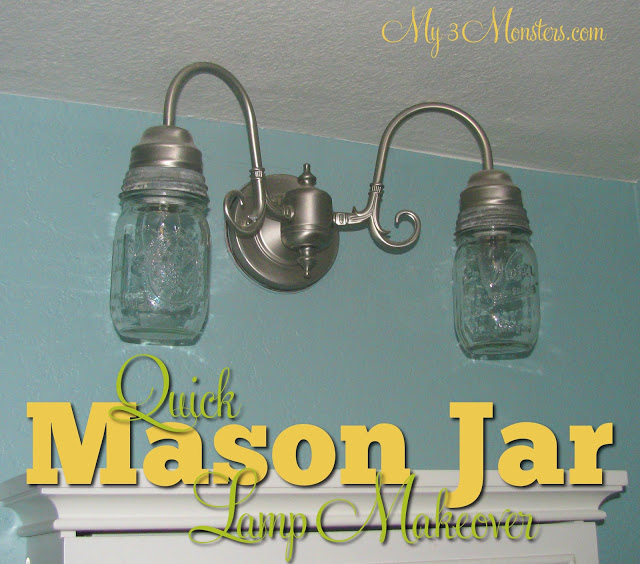
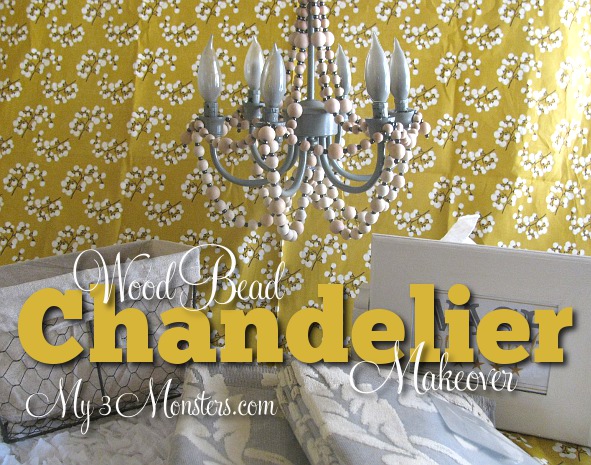
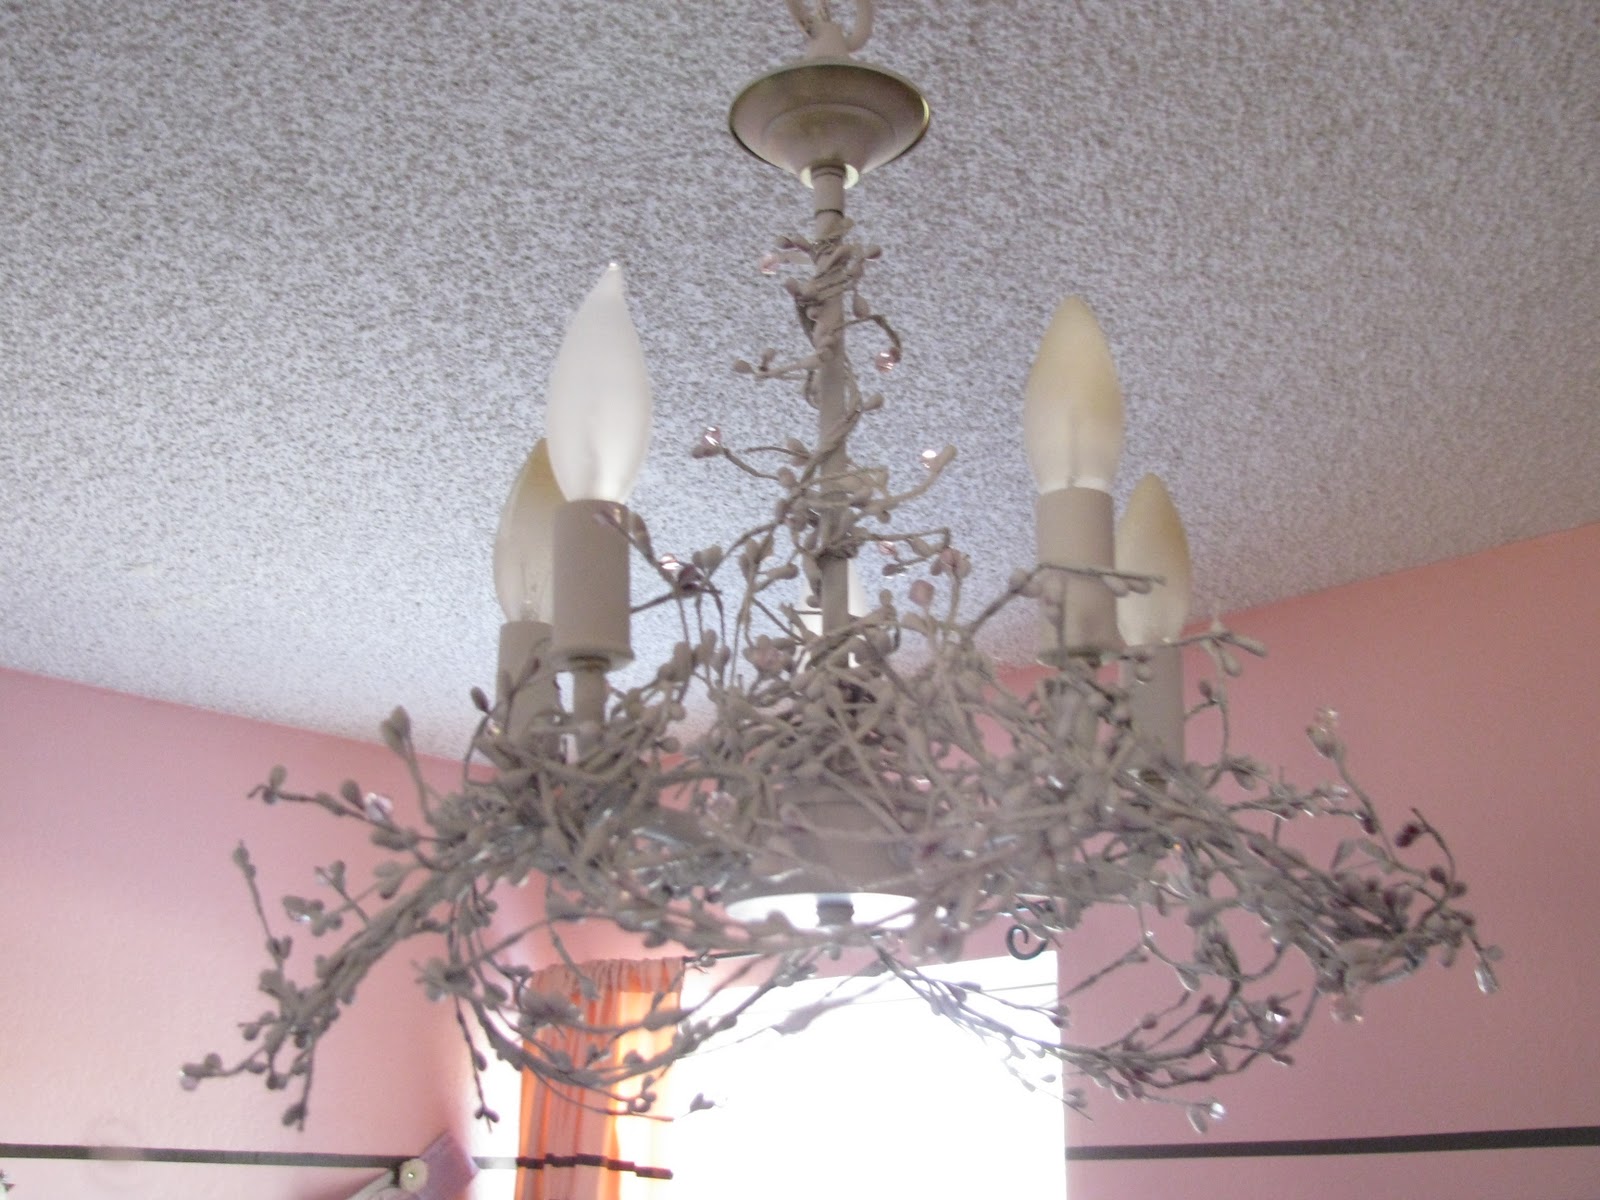
6.  Light Fixtures and Lamps -- I saved my favorite for last.  I LOVE to take an ugly old pendant light apart, paint it, and put it back together as a fun chandelier.  These are probably the most satisfying projects to me and the most fun.


Questions to Ask Yourself When Shopping:

1. What else could this be used for?  Be creative and think out of the box.  You may find a tool chest when you are looking for a bed-side table, like I did when I redid my boys' bedroom.  A cool dining table makes a great desk.  A ceramic platter makes a good dry erase board.  You get the idea.

2.  Will it fit where I want to use it?  If you are looking for a specific space, take measurements and a measuring tape with you!  It would be super disappointing to buy a really cool dresser that you want to turn into a bathroom vanity only to find that it is an inch or two too long.

3.  How much time/effort/expense will this require?  Some things are going to need a lot of work and it may not be worth your time and effort to do it.  That chair may only cost $10, but factor in the cost of fabric and the ten hours it will take to reupholster it and it may not be such a good buy after all.

4.  Is it worth fixing up?  Some things were just junk to begin with and no amount of love will change that. 

5.  Am I really going to do this?  You might have big plans and be super excited about it in the moment, but are you going to actually do it, or will it sit in your garage untouched after reality sets in?  A $10 chair is not a good buy if it sits in your garage forever.

Weapons in Your Repurposing Arsenal

1. Paint -- almost everything looks better with a fresh coat of paint.  Spray paint, chalk paint, acrylic craft paint, sample jars from the home improvement store, you name it!

2.  Mod Podge -- lots of things can be saved by Mod-Podging fabric or decorative paper onto it.

3.  Staple Gun -- good for reupholstery or working with my personal favorite, chicken wire.

4.  Hot Glue Gun -- don't tell anyone, but I might have used a few dabs of hot glue as an extra set of hands when reupholstering something or putting up trim work.  It's good for a lot more than just crafts.

5.  Gorilla Glue / E6000 -- both super strong glues that attach surfaces other than paper together.  Especially good for attaching metal to almost anything.

I'm sure there are a thousand other things we could add to those lists, but it's a pretty good start.  I hope that inspires you to go out this weekend and find yourself a project!

Have a great day!

Amy


2.25.2014

Lucky Shamrock Pillow

St. Patrick's Day Lucky Shamrock Pillow at /
How embarrassing is it that I still had my Christmas pillows on the front porch bench until yesterday?  I justify it to myself by saying that , technically, they were "winter" pillows not Christmas.  And it IS only February, which is still winter in many places even though it feels like summer here.  Whatever.  Problem solved!  I made a couple St. Patrick's Day-inspired pillows to match the wreath I shared yesterday on Craftaholics Anonymous.  

I've had this gold polka dot burlap hanging around in my craft closet since I used it as a table topper back in November.  It felt like the perfect nod to St. Patrick's Day, without being "slap you in the face" obvious.  You know . . . leprechauns, gold coins at the end of the rainbow, right?  I just sewed up a plain old square pillow cover with a zipper in the bottom.  Nothing fancy, but I love the little bit of glitz it adds to the bench.  {Here's a great tutorial if you are wondering how to make a zippered pillow cover.}


St. Patrick's Day Lucky Shamrock Pillow at /
The second pillow is my favorite.  I made an actual pillow instead of a pillow cover, but it would work either way.  

Lucky Shamrock Pillow Cover Tutorial

1. To begin, cut a piece of fabric to fit the front of your pillow.  Don't forget to add 1" to the length and the width for seam allowances.  

2. Next, you're going to cut out three heart shapes from a green fabric of your choice.  I went with another polka dot print.  It seems to be a theme here -- I can't help that I'm always drawn to polka dot prints.  Cut out a stem, too.  Just eyeball it -- I didn't use a pattern.  

3. Pin the pieces onto the pillow front fabric to form a shamrock.  Stitch around the edges of each piece, about 1/8-inch from the edges.  You can either machine stitch it or sew it by hand. 

St. Patrick's Day Lucky Shamrock Pillow at /
4. Once all the pieces are sewn on, wad the fabric up and rub it together to really rough up the edges of the green fabric and make them look frayed.  

5.  At this point I sewed the back of my pillow to the front.  If you want to make a pillow that you will stuff, like I did, you will cut another piece of fabric the same size as the front piece.  Line the two pieces up, right sides together, and sew around the outside edge using a 1/2-inch seam allowance.  Leave a 4-5 inch opening on the bottom edge for stuffing.  Turn the pillow cover right side out and fill it up with stuffing.  Pin the opening closed and stitch it shut with a needle and thread.

If you want to make a pillow cover you can either do a zippered closure like we did on the burlap pillow or make an envelope closure like I did here.  

6.  For a fun finishing touch I sewed on these charms that I found in the jewelry section at Michael's. If you can't find the exact same charms, you could also drill little holes in the tops of some Scrabble tiles to spell out any word you like.  {In fact, I might do that to add a "Y" so that it reads "lucky" instead of just luck.}


St. Patrick's Day Lucky Shamrock Pillow at /

It's a fun, subtle way to tie my front porch all together.  It's never ceases to amaze me what a big difference it makes to add pillows to my outdoor bench.  The porch feels so much more home-y and welcoming.  I just have to remember to bring them in when {if?} it rains.  

Shamrock Wreath at / Don't forget to go over and check out the matching wreath on Craftaholics Anonymous if you haven't already!


Have a great day, guys!

Amy

I'll be linking this project up here:


2.24.2014

Shamrock Wreath on Craftaholics Anonymous Today!

Hello, friends!  I hope your weekend was fantastic.  I'm really excited because today's my big debut over at Craftaholics Anonymous -- my first guest post as part of the creative team!  I'm sharing a tutorial for this simple, cute St. Patrick's Day wreath.  I'd love it if you would come on over and check it out!  Linda has so many great projects on her site, I'm sure you'll be there a while getting inspired to create something yourself.  

Come back here tomorrow and I'll show you how I made a couple pillow covers for my front porch bench to go with this wreath.


Have a great day!

Amy


2.22.2014

Scrappy Photo Frame Garland

Scrappy Photo Frame Garland at /
I am super excited to be a part of Kristen Duke's Decorating with Pictures series this year on her blog Capturing Joy!  I have never been really good at decorating my home with photographs, but Kristen's blog has really inspired me over the past year or so to introduce more family photos into our decor.  {And to be a little braver about getting into those photos myself rather than hiding behind the camera.}

Today I'm sharing a fun Scrappy Photo Frame Garland that I made to embellish my chicken wire kitchen cabinets.  It would also be a pretty cool addition to a mantle or any wall in your home.  I bought these little unfinished wood frames over a year ago and they have just been sitting in my craft closet waiting for me to decide what they were going to become.  I finally got the stroke of inspiration I needed a few weeks ago as I was looking at some cute family photos we had taken at the Gilbert Temple open house.  I had originally thought I would print the photos out and just clip them to the chicken wire with mini clothes pins, but these little frames are just too perfect!

I began by painting the frames with my favorite turquoise spray paint {Valspar's La Fonda Mirage in flat finish}.  The frames fit wallet sized prints, so while the paint was drying I had my photos printed.  Once the paint was good and dry {after I messed it up on one frame and had to sand and repaint} I attached screw eyes on both of the side edges on each frame.  Drill a tiny pilot hole to keep the wood from splitting as you insert the screw eye.

Scrappy Photo Frame Garland at /
Attach the frames together by tying a piece of sturdy string through the screw eyes as shown above.  You'll be making a "train" of picture frames, in effect.  Mine are about 4 inches apart between frames.  It doesn't really matter what you use to tie them together because it's not going to show on the finished garland.  I had a roll of jute twine handy so that's what I used.

Scrappy Photo Frame Garland at /
Next, tear a bunch of fabric strips about 1-inch wide from coordinating fabrics then cut the strips into approximately 6-inch lengths.  They don't have to be perfect -- I pretty much just eyeballed it.  Tie the strips of fabric onto the twine in between the frames.  I found it easiest to start from the center and tie one fabric strip around the knot, then work out in each direction until you reach the screw eye on each end.  You can pack the scrap strips in there as loose or as tight as you like.  I think I used 20-25 strips between each frame and about 10 more on each end.

For the ends of the garland, I tied a loop of twine through the screw eye and then tied a few fabric scraps onto that.  The twine loop will be what you use to hang the garland when it is finished.  After I finished my garland I realized that I HATED the color combination, so I went back and took off all the pink and red scraps and replaced them with more of the white and black polka dot strips.  Sometimes that happens.  No big.  Just roll with it!

Scrappy Photo Frame Garland at /
Insert the pictures into the frames.  At this point, you could be finished and hang your garland.  I wanted to add labels to mine, so I picked up these cute metal book plates in the scrapbooking section at Michael's.  Because they're made for paper, not wood, I hot glued them in place under my pictures.  I used colorful washi tape to make inserts that I could write the labels on -- just a brief description of the time and place.  It will be really easy to swap out pictures and labels as we get new pictures that we want to display!

Scrappy Photo Frame Garland at /
To hang the garland, I used simple S-hooks that I picked up at the hardware store.  I just put one end of the hook through the twine loop at each end of the garland and the other end of the hook onto the chicken wire. It held it nice and secure even with the weight of the frames.  I also put an S-hook in the center because I liked the way it looked.

Scrappy Photo Frame Garland at /
Because the pictures are small, it invites people into our home to get a closer look.  A friend of mine saw it from the front door as we were chatting and had to come on in to see the pictures.  I love that!  It's a bright, cheerful reminder of some of the fun things we've done together.  Isn't that the best way to decorate after all?! 

Thanks, Kristen, for inviting me to be a part of your fun series!  If you want some more fabulous inspiration to use photos in your home, check out the whole series here:

http://www.kristendukephotography.com/decorating-with-pictures/

In addition to all the awesome ideas, there are also two new giveaways every day, all month long!  Go win yourself something pretty!

Have a great day!

Amy


2.19.2014

Winger's Copycat Asphalt Pie

Winger's Asphalt Pie copycat recipe at /
Today's "recipe" is not really much of a recipe at all.  What it is is one of my all-time favorite desserts.  It is SUPER yummy and incredibly easy to make, which you know makes it a winner in my book.  When Brent and I were first married we always went to Winger's for date night.  We would eat a huge pile of their signature sweet and spicy chicken wings and then, even though we were already full to the rafters, we always finished the meal off with a piece of their Asphalt Pie.  We haven't lived near a Winger's in years, but every so often I get a hankering for a piece of that pie so I whip up one of my own.

Asphalt Pie

about 1/2 pack of Oreo cookies
4 Tbsp. melted butter
1 carton mint chocolate chip ice cream, softened
caramel sauce
whipped cream

Set ice cream out on counter top to soften.  Take about 1½ rows of Oreo cookies and crush in a food processor or blender to make 2 C. of fine crumbs.  Mix cookie crumbs with melted butter and press into  a 9" pie dish to form the crust.  Scoop the ice cream into the pie dish and carefully spread until evenly distributed.  Place back in freezer for several hours until ice cream is hardened again.

Before you clean your food processor, crush 4-6 Oreos into large chunks to serve on top of finished pie. Place in a zip-loc bag and save for later.

Before serving, drizzle with caramel sauce, sprinkle on cookie crumbs {I omitted them because my husband is not much of a fan} and add whipped cream. 

Winger's Asphalt Pie copycat recipe at /
I know mint and caramel seem like an odd combination, but they taste soooo good together!  I might have to make another one of these yummy pies for my family in a few weeks for St. Patrick's day . . .

Have a great day!

Amy


2.18.2014

A Few More Thoughts on Zubie

This post brought to you by Zubie. All opinions are 100% mine.

By now, I'm sure nearly all of you have heard me talking about Zubie here on the blog and on my social media channels.  We've been using it since just after Christmas {about 6 weeks} and I love that it has given me a ton of insight into the way we drive and how we use our vehicle.  Before Zubie, I never realized someone in our family has a lead foot -- not necessarily when it comes to driving, but FOR SURE when braking.  I also didn't realize how much we let our car idle -- waiting in line at drive-thrus {yikes!} or waiting in the car while one person runs in to grab something "really quick".  How do I know this?  Zubie gives us a driving score based on those criteria along with a few others.


So, you can see as well as I can that we have some areas to improve in.  This is a composite score for all three of us who drive the car, of course.  There's no way to single out individual drivers on shared vehicles, but if I look at the trip summaries, I can see who {ahem, my husband} is the Hard Braker around here.  It's OK to call him out since I'll admit that I'm the Idler.  It's awesome to see that we do well at obeying the speed limit {thumbs up to my teen driver!} and driving at night.  Maybe I'm just a geek, but I find information like this endlessly fascinating.

I also still really appreciate the engine diagnostics and the battery monitor.  The excessive heat here in Arizona is brutal on car batteries and there is nothing worse than being stuck in the grocery store parking lot with melting ice cream and a car that won't start in July.  Been there, done that.  I won't have to worry about it again because Zubie will let me know when it's time to replace the battery BEFORE I am stranded somewhere.  No more guessing games.  It's a beautiful thing!

I showed you what the Zubie key looked like in my last post, but I didn't show you how it plugs in.  Here is what it looks like in our little Ford Focus:


It plugs in under the steering wheel, down near the gas and brake pedals.  Super inconspicuous and out of the way.  The location is a little bit different on all cars, but most {if not all} cars '96 or newer have a port the Zubie can be plugged into.  Once you plug in and get it all set up. you will pretty much just forget it's even there.  You'll access all the fun info from the Zubie app on your smartphone.
I highly recommend Zubie to families who have teen drivers to keep track of.  I cannot even begin to express the peace of mind this little device brings to me as mom with a kid on the road.  It has been good for my husband and I as well, though.  I think just about anybody can benefit from being more aware of themself as a driver.

Hit the road with Zubie!  Order today and SAVE 20% on your Zubie Key plus one year of service with code SAVE20FEB.  {Offer good through March 31, 2014. Shipping charges apply.}  There's no better time to get started!

Connect with Zubie on Twitter  and on Facebook.

Visit Sponsor's Site

2.15.2014

Morning Energy Muffins

This post brought to you by Honey Bunches of Oats. All opinions are 100% mine.

We love cereal around here.  Seriously.  It's our go-to after school snack.  I keep big glass jars of it on our countertop so it's always easy for my kids to get at.  My husband and kids would be pleased if I spent our entire grocery budget on cereal and milk.  Needless to say, when a box full of *BRAND NEW* cereal arrived in the mail the other day it was like Christmas all over again.  Pure elation.

Honey Bunches of Oats Morning Energy cereal is full of whole grain, protein, and fiber so it fills my kiddos tummies and keeps them going all morning, but it is still yummy enough that they didn't complain about having to eat "grown up cereal".  It comes in two flavors -- Cinnamon Crunch and Chocolatey Almond Crunch.  I especially like the Chocolatey Almond Crunch because, hello, chocolate and almonds - duh - but the rest of the fam preferred Cinnamon Crunch.  Both were pretty dang tasty!

Our days start early around here.  We have to be out of the house by 6:15 to get Sis to her zero-hour seminary class at the high school and Ri to track practice.  The kids aren't always hungry that early in the morning -- or they're more eager to sleep in an extra 10 minutes rather than make time to eat a bowl of cereal.  I still want them to have a good, healthy breakfast they can take on the go so I baked up a batch of these Morning Energy Muffins using Honey Bunches of Oats Chocolatey Almond Crunch cereal to make the batter.  They were super delicious, with little chunks of chocolate and granola clusters throughout the muffins.  My kids requested that I make more as soon as they were gone, which is high praise!


Morning Energy Muffins

½ C. applesauce
3 C. Honey Bunches of Oats Morning Energy Cereal
1 ½ C. milk
1 C. whole wheat flour
1 C. white flour
4 tsp. baking powder
1 tsp. ground cinnamon
½ tsp. salt
2 eggs, lightly beaten
½ C. packed brown sugar
Preheat oven to 400º.  Place paper liners in muffin tins.  {This recipe makes about 2 dozen muffins.}  In a mixing bowl, combine the milk and cereal.  Let it sit for about 5 minutes until the flakes get soft.  In another bowl, whisk together the flours, baking powder, cinnamon and salt.  Stir the applesauce, egg and brown sugar into the cereal mixture.  Fold the dry ingredients into the wet ingredients.  Divide the batter between your muffin cups.  Bake 20-25 minutes until golden brown on top and toothpick inserted into center comes out clean.

My kids can grab a couple of muffins and a piece of fruit out of the fridge and have a super delicious, healthy breakfast on the go.  Mom for the win!!  Time to go make another batch of muffins with the Cinnamon Crunch cereal before the family eats it all.  Which flavor sounds yummiest to you?

Connect with honey Bunches of Oats on Facebook and on Twitter.

Have a great day, guys!

Amy


Visit Sponsor's Site

2.13.2014

Curls for DAYS!

Curls for DAYS with just an inexpensive curling iron at /
It feels like FOREVER that Sis and I have been growing out our hair together.  Remember a couple years ago when she decided to get a super cute pixie cut?  Yeah.  Since just a few months after that.  FOREVER! It's been a good long while since I had short-short hair like that -- mine has been somewhere between my chin and shoulders for years.  Secretly I've always wanted it long.  I've been tortured every time I go on Pinterest and see all the gorgeous long hair with perfectly beautiful, effortless curls.  Even if I could get my hair to grow past my shoulders, I knew it would never look like that.  First of all, I don't have a good hour a day to spend on  my hair {like I did in high school}.  Not gonna' happen.  Secondly, my hair won't hold curl anymore, so even IF I DO spend an hour curling it, it will be flat and stringy looking by mid morning.

Sis's hair is the same way.  We've tried everything under the sun to create lovely curly locks with very little success.  Heatless methods tend to be unpredictable -- what works one time can turn out awful the next and then you're stuck with this ugly hair all day because you put all your eggs in the sock-bun-basket, so to speak.  Plus, our hair is super thick so it doesn't always dry overnight when it's all wound up.  Hot rollers were a no-go.  I could never get the hang of flat-iron curls so they just looked frizzy and fell out quickly.  Then, one day on a whim, I picked up a cheap little ¾-inch barrel  Conair curling iron at the grocery store -- the grocery store of all places! -- and started playing around with it.  Wouldn't you know, I figured out a way to curl my hair in about 20 minutes that lasts, I kid you not, THREE DAYS!

I'm sure this isn't anything new, but I had never curled my hair this way before and I have certainly never gotten this kind of results so I am hooked!  You won't believe just how easy it is.  Sis is being my model for this post and showing you how it's done:

Curls for DAYS with just an inexpensive curling iron at /
Divide your hair into two layers, parting it just above your ears, and clip the top section up out of the way.  If your hair is thin you may not have to do this.

Curls for DAYS with just an inexpensive curling iron at /
You actually make the curl just like a flat iron curl, but using a curling iron instead.  Take a small section of hair and clamp the curling iron on in about the middle of the length of it. {I like to curl my hair in about 1-inch sections.  If you go smaller your curls will be a little tighter and if you take a bigger section, they'll be a little looser.}  There will be a "tail" of hair sticking out the end.  With the hair clamped inside, turn the curling iron one full rotation {as shown in the photo}. 

Hold the curling iron with one hand and grab the tail of the piece of hair with the other hand.  Pulling the tail taut, slide the curling iron UP the length of hair until it is close to the scalp.  Then, keep holding the tail of hair as you SLOWLY and gently pull the curling iron toward the end of the hair, until the whole piece has been around the barrel and is curled. Use your thumb to control how tightly the clip is holding the hair.  Depending on how long your hair is, it should take 20-30 seconds to run the barrel of the curling iron down each length of hair.   

Curls for DAYS with just an inexpensive curling iron at /
You'll end up with a ringlet that is curled from root-to-tip.  {Sorry! This picture isn't very good.  I don't think the curling iron was hot enough yet.  You get the idea though, right?  Long ringlet.  OK.}

Continue taking sections and curling until all your hair is finished.  Once you finish the bottom section, just take out the clip and work on the top section.  Spray it lightly with hairspray and allow all the curls to cool completely.  Comb through it with your fingers to break up the ringlets and you're all set.  I usually back comb the roots a little bit for some volume, but the less you do to it, the better.  On the second and third day, the curls loosen up {which I like better} and I just spray the roots with my favorite dry shampoo.  If I have any sections that are too straight, I just touch them up with the curling iron and it looks brand new.  

I am loving wearing my hair curly, but I love even more that I don't have to blow dry.  That was the thing I always dreaded the most about getting ready for the day.  I wash my hair at night now and put a little heat-protectant cream in it while it's wet then let it air dry throughout the evening and while I sleep.  In the morning I curl it, which only takes about 20 minutes, which is a lot faster than my old blow dry and flat iron routine.  On days two and three, I put it up in a bun or shower cap while I shower to keep it dry.  

You just have to look at my pretty daughter one more time:

Curls for DAYS with just an inexpensive curling iron at /
I mean, the hair is cute, too, right?  Do you have a favorite go-to hairstyle?  Share your tips in the comments!

Have a great day, friends!

amy


2.11.2014

PERK Up Your Smelly Car!

This post brought to you by PERK. All opinions are 100% mine.

HI guys!!  If you're like me, you probably set some goals for yourself at the beginning of the new year.  One of mine was to take better care of some of our things that I tend to neglect -- the yard, for one. I hate gardening and it shows.  Another one was our van.

I spend a LOT of time in my van, running errands and chauffeuring my children around town.  It is like our second home -- the one that doesn't get cleaned on a regular basis and could be featured on an episode of hoarders.  We eat in there more often than I'd like to admit, in the rush between track meets, voice lessons, and church youth activities.  If my kids ever can't find their jackets or their text books or their scriptures, more often than not we will track the lost item down in the van.  It's mildly annoying to me, but to my husband it is a major source of embarrassment.  He was raised believing that a car had to be kept clean to run properly.  To his credit, he keeps his car pretty clean.  In my defense, he doesn't have the kids in his car as often as I do in mine.  Whatever.

I was super grateful when he took the kids out last weekend and washed and detailed the van for me.  They vacuumed all the floorboards and mats.  They removed all the trash and wiped everything down.  They even polished the tires for me.  I love those guys!!  The one thing they didn't take care of was the smell.  You know that "sweaty track shoes meet stale french fries" old van smell?  This is where my husband and I differ -- it doesn't matter how clean the car is -- if it doesn't smell clean it's not clean in my book.


PERK vent air freshener to the rescue!  These could not have come at a better time.  Believe me, I have tried plenty of products to make my car smell clean and they all have their pros and cons.  Lots of them are bulky or tacky looking, but not PERK vent wraps.  What is a Vent Wrap?  This little video explains it best:


See it on there?  You only notice it if you're looking for it, which is so much nicer than something dangling from the rear-view mirror or a big, clunky plastic thing-y that keeps you from adjusting the vent.  Now my car smells as awesome as it looks and Brent and I are both happy!  I used the Clean Laundry scent and it reminds of the olden days, when we lived in an apartment and did laundry at my parents' house.  Our car always smelled so good after I drove back home on laundry day!  I will always think of that now when I drive my van.  The other vent wraps that came in the pack are individually wrapped so I can throw them in the glove box and open a new one in a few weeks when this one runs out.  Each pack of 4 wraps will last almost 2 months.

If Clean Laundry isn't your thing, there are plenty of other fragrances to choose from.  Brent was jealous of my delightful-smelling car and put a New Car scented PERK vent wrap in his car.  It smells more like baby powder than "new car" to me, but it's still yummy.  If you want to try some for yourself, you can buy PERK at Advance Auto Parts, Walmart, Target, and other retailers.  Or you could enter to win a SIX-MONTH SUPPLY right here!

a Rafflecopter giveaway


Like PERK on Facebook for more info!

Have a great day, friends!

Amy


Visit Sponsor's Site

2.10.2014

Funky Deer Head Silhouette Printables

Free Printable Deer Head Art at /
Hi guys!!  It's been a while since I put something new in my interchangeable "frames" -- in fact, they've been empty since I packed away the Christmas printables.  For shame!  It's probably high time to make something new.  How do you all feel about the antler trend in decorating?  It's deer heads and antlers as far as the eye can see on Pinterest, but I've been on the fence.  Part of me LOVES it . . . in the right space, done the right way.  Like here, in the Nester's old office.  She can almost do no wrong in my book.  Whatever.  A bigger part of me, however, knew that I would never commit to that look in any real way.  You know, the way that requires a financial investment.  But for the cost of some $2 printables . . . I might give it a shot.  With my own cottage-y twist, of course.

I bought a bunch of fabrics at Hobby Lobby the other day to make my Vintage Valentine Bunting and fell in love with the way they look together.  I wanted to use them in the living room somehow to tie those two spaces together.  So, being the smarty pants that I am, I scanned the fabrics into my computer and used them to make my printables.  After I made the buck for the center frame, I was stuck with two more frames to fill.  Since it's nearly Valentine's Day, I couldn't resist being a little "punny" and making some love-y sayings to go with him -- Have a "Hart" {A hart is a male deer.  I had to explain it to my family.} and "Near and "Deer".  I know, it's cheesy, but that's kinda' how we like it here.


Free Printable Deer Head Art at /
Just look at that gorgeous font!  It's called Nelma and I have been trying to figure out how to use in something for a while now.  I used the base of the letters as a mask to digitally cut out the fabric I scanned and then left the black swirly curliques on top.  It's probably my favorite part of this project.  But I do love the polka dot deer silhouette, too . . .  It's so hard to decide . . .

Free Printable Deer Head Art at /

Free Printable Deer Head Art at /

Free Printable Deer Head Art at /


The images above are 11x17 inches to fit in my interchangeable frames.  Below are the 8x10 versions that would fit in normal frames.

Free Printable Deer Head Art at /

Free Printable Deer Head Art at /

Free Printable Deer Head Art at /

 To print these images for your personal use:

Simply hold the CTRL button down while clicking on any of the images below to open it in a new window.  In the new window, make sure it is full size by clicking on the image then right click and save it to your computer.  The odd size designs -- 11x17 -- can be printed by uploading the files to Staples Copy & Print Center website and choosing a full-color 11x17 cardstock print for less than $2.  The standard size files -- 8x10 -- can be printed at any photo processing center and framed.


Free Printable Deer Head Art at /
If I had a baby girl I would totally use these in her nursery.  Since my "baby" is a boy -- and he's 12 years old -- they'll hang in our living room until I come up with something else to put there.  What do you think?  Love or leave the deer head/antler trend?

Have a great weekend!

Amy


Related Posts Plugin for WordPress, Blogger...