This post is sponsored by Martha Stewart Crafts/Plaid and BluePrint Social.
It's that time of year again . . . Back to School. Love it or hate it {we have both sides represented in our home} it happens nonetheless. One of my very most favorite things about this time of year is buying school supplies. Fresh #2 pencils with their perfect pink erasers . . . composition books . . . binders . . . .Mmmm! Love it all. Turns out when we got home from our annual supply shopping trip this time we were one binder short. How we managed that I'll never know. Instead of braving the over-crowded store aisles again, I dug out a perfectly good binder we already owned. Not one of my children would be caught dead with that binder in their backpack. {You'll see why. Hee hee.} Major props to Martha Stewart Decoupage for saving the day!!
I mean, it's not THAT bad, is it?!
Yeah. It's that bad and then some. I picked it up years ago on back-to-school clearance {What?! Nobody else wanted it then either?} to use as a coupon binder. Since I no longer coupon religiously it was just sitting, waiting to be loved again. The good news is that I had just received a box of Martha Stewart Decoupage goodies in the mail to play around with. Martha Stewart makes everything prettier!
Just look at that pretty lace! And I couldn't wait to try out the oilcloth finish. It's washable! What?! We started off taming that colorful monstrosity of a binder with a solid turquoise finish using Martha Stewart Multi-Surface craft paint. The color is called Surf. It took 3 or 4 coats to cover up alla' that color and pattern, but it worked beautifully. I love the multi-surface paint because it doesn't get that yucky crusty feeling finish when you use it on fabric.
I should have taken a photo of it at this point, but I was too excited to start dolling it up with the lace.
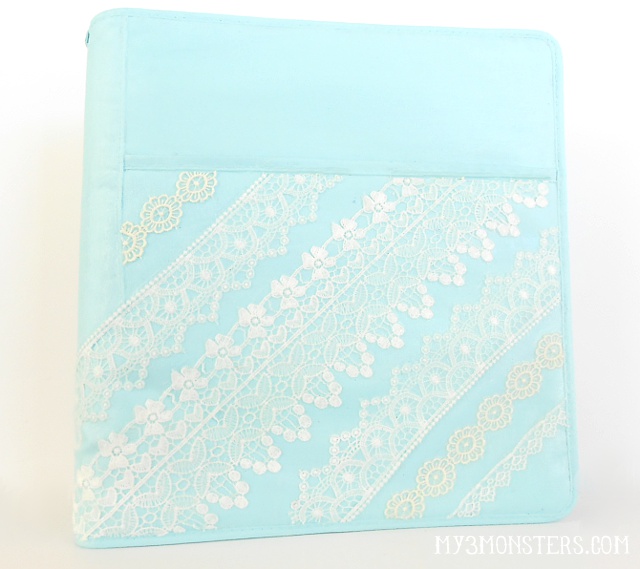
 I placed my lace on the diagonal, following the seams on my binder. I laid out the lace first, cutting it to fit. Then I painted on a fairly thick coat of the decoupage, laid my cut lace in place on top, followed by another fairly thick coat of decoupage. It seems like a lot, but you want to make sure the lace is completely saturated so it will adhere well. I painted a coat of the oilcloth finish decoupage all over the binder at this point as well.
After waiting a couple hours to allow that first coat to dry completely, I painted about 3 more coats all over the binder {drying in between}. You may feel like you are ruining your project with each new coat as you see all the holes in the pretty lace fill up with white goop. Just know that it will dry clear and the lace is beautiful again when all is said and done.
Once all my coats were dry I didn't love the brush strokes I could see in the shiny finish. That is probably just due to my poor decoupage technique. I took a small piece of fine grit sand paper and gave the whole binder a VERY light sanding. This just smoothed the whole thing out and polished it right up to a perfect oilcloth gleam.
I placed my lace on the diagonal, following the seams on my binder. I laid out the lace first, cutting it to fit. Then I painted on a fairly thick coat of the decoupage, laid my cut lace in place on top, followed by another fairly thick coat of decoupage. It seems like a lot, but you want to make sure the lace is completely saturated so it will adhere well. I painted a coat of the oilcloth finish decoupage all over the binder at this point as well.
After waiting a couple hours to allow that first coat to dry completely, I painted about 3 more coats all over the binder {drying in between}. You may feel like you are ruining your project with each new coat as you see all the holes in the pretty lace fill up with white goop. Just know that it will dry clear and the lace is beautiful again when all is said and done.
Once all my coats were dry I didn't love the brush strokes I could see in the shiny finish. That is probably just due to my poor decoupage technique. I took a small piece of fine grit sand paper and gave the whole binder a VERY light sanding. This just smoothed the whole thing out and polished it right up to a perfect oilcloth gleam.
I adore the oilcloth finish! Together with the oh-so-pretty lace it has a bit of a vintage feel to it. Like if they had Trapper Keepers back in the 40's . . . or something. When the binder gets dingy from being used day in and day out, we can just wipe it clean and it will be as good as new. My daughter will happily claim this binder now that it got a "Martha" glam makeover. The best part is, no one in school will have one like it! {Mom of the Year doing a happy dance right here.}
Head to Michael's craft store and check out the entire Martha Stewart Decoupage line. The decoupage medium comes in a variety of finishes and, in addition to the lace, there are beautiful fabrics and papers, as well as cutout shapes that you can use to create a million one-of-a-kind projects.
You can also find Plaid Crafts on Facebook, Twitter, Pinterest, and their blog Paint Me Plaid.
See what others have created with these products:
*This post is sponsored by Martha Stewart Decoupage and Plaid as a part of a Blueprint Social Campaign. I received product and compensation for sharing my experience with my own craft project and tutorial in my own words. All opinions are 100% my own.


The binder looks amazing! I love the lace detail.
ReplyDeleteSo cool! I love how these came out! So pretty!
ReplyDelete