My 3 Monsters: August 2012

Recent Posts

8.27.2012

Color Matching Your Switchplates
& Outlet Covers with RIT Dye

I was poking around on the Rit dye website this weekend and discovered the coolest thing!  Did you know that you can dye your switchplates and outlet covers to match your wall paint?!  Seriously!  I only ever think of using RIT dye on fabric {hello, tie dye}, but there is a whole world of things you can use that stuff on -- furniture, home decor items, art projects, and so much more.

Switchplate covers are {usually} made from unbreakable nylon which takes dye beautifully.  I recently painted Sydney's bedroom navy blue and was distressed by the glaring white outlet covers.  I thought about painting them, but when you do that the paint scratches off so easily and they end up looking junky.  There are fancy colored switchplates on the market, but I'm trying to stick to a super-tight budget here and the 44 cent builder's grade option fit into that better than the double-digit-dollar designer options.

So I ran out and purchased 4 new outlet covers and a box of navy blue Rit dye and decided to try my luck.  If you look on the Rit website they have "recipes" for making 500 custom colors by mixing their standard colors.  I mixed the powdered dye packet into about 2 C. hot water in a glass bowl and submerged the outlet covers one at a time for about 10 minutes each.  It was just like dying easter eggs, really.  Once the color was as dark as I wanted, I pulled the pieces out of the dye with a pair of tongs and rinsed them off.  The color darkens a bit once it is dry.  

Here's what you end up with:


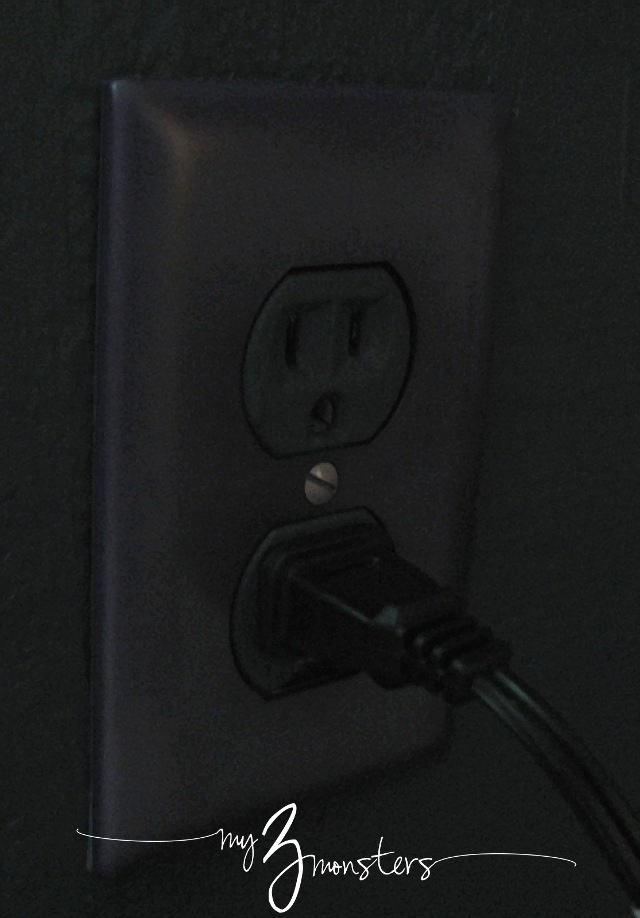
I was thrilled with the result!  The navy blue was almost an exact match to my paint color.  Who knew you cold do that, right?  It was the perfect solution that didn't break the bank at just a little over $4.

Here's a sneak peek at the progress in the rest of the room:


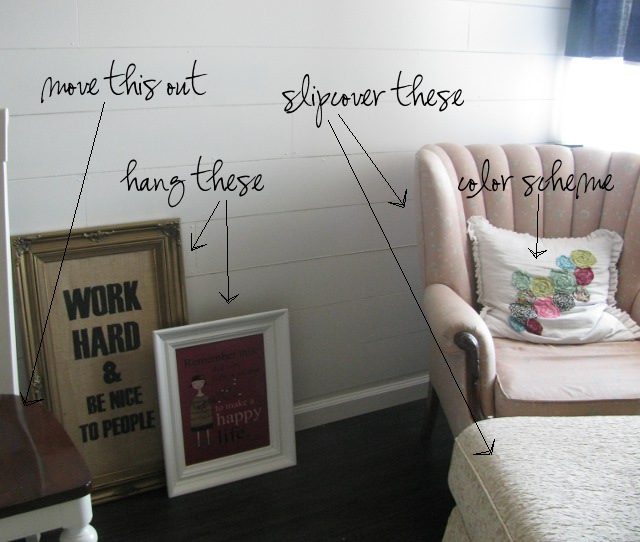
I still have quite a bit of work to do, but it is coming along nicely.  Three of the walls are navy blue and then there's this white plank accent wall, which is the STAR of the room.  There will be lots of raspberry pink accents along with a little turquoise and lime green.  The overall effect of the room is crisp and bright {a little bit preppy, a lot sophisticated} and I am TOTALLY jealous of Sis for getting to live there.  However, she is only 4 short years away from heading off to college . . . This room could be my craft room/guest room one day . . . Not that I'm in a rush to get her out of here or anything . . . 

Now run along, my friends, and dye all your switchplates and outlet covers!!  {And have a great day, too.}

8.25.2012

A Week's Worth of "Pin-spired" Dinners

I mentioned last week that I have been really trying to cook dinner at home more.  We have gotten into the really bad habit over the past couple of years of either running through the drive-thru for dollar menu burgers or 59 cent tacos {both cheaper than I could make them at home} several times a week or having what we call "fend for yourself" where everyone just eats whatever they want for dinner.  I've tried to justify it by saying how "busy" I am and by pointing out the fact that we ALWAYS eat dinner together, even if we're not all eating the same thing.  

Truth be told, I'm not that busy.  Not so busy that I can't cook dinner, really.  I like to have my hands in lots of pots {metaphorically}, but usually none of them are so pressing as to keep me from spending 30 or 40 minutes a day making a meal for my husband and children.  Or helping my children to make one as the case may be.  Wanna' know what's really sad about this situation?  My kids are soooo not picky eaters.  They'll eat anything pretty much and they are extremely grateful and sweet to me when I do cook.  Lots of moms are not so lucky.  I know.  I'm committed to doing better.  

One thing that really gets me excited about cooking is making something new and delicious, so here's a round-up of some of our favorite new dinner recipes that I have found on Pinterest!  {Click on each photo to be taken to the recipe source.}


We are HUGE fans of mexican food around here and these were delicious!!  

Source: recipebiter.com via Amy on Pinterest

Crock pot Chicken Tacos from Recipe Biter
You'll notice that crock pot meals are my salvation,  I love having dinner ready for me when we want to eat so I'm not scrambling {and potentially talking myself out of cooking} at the last minute.


Another crock-pot recipe -- Mongolian Beef from Notes from the Heartland
This was a huge hit with coconut rice on the side.


Source: lilluna.com via Amy on Pinterest

Light and delicious.  My kids inhale these so fast I'm not really sure if they have ever really tasted them.  I always make a double batch so we can have them for lunch the next day.


I didn't know if my kids would like this one with the dijon mustard and tarragon -- two pretty unfamiliar flavors to my kiddos, but we really enjoyed it.  There is also a handy hint about substituting milk and butter for heavy cream  with this recipe.


Brent really liked this one.  He thought it would be good to substitute swiss cheese and add some sliced pears to make it more like the Farmer Sandwiches his mom used to make.  


This is Dylan's favorite recipe to make when it's his turn to cook dinner.  He always just bakes the chicken fingers and makes the sauce while they are in the oven.  They are the perfect mix of sweet and spicy,

If you have any favorite dinner recipes, please leave a link in the comments,  I'm always looking for something new!  Follow me on Pinterest to see all the latest recipes I'm trying out.  Have a great weekend!

8.24.2012

When Life Gives You Lemons
{and it will . . . }


Oh man.  We just can't catch a break around here.  I finally got the insurance drama from two weeks ago figured out and our bank accounts squared away just in time for my son to get himself suspended from school for a day and my husband to wreck our new car.  It's always something, right?

I'm not going to dwell on my proverbial lemons today -- we all have our share -- but I did decide to make lemonade.  And that lemonade printable at the top of the post.  I made that today, too. Back to the lemonade:

I pinned this recipe on Pinterest a while back because I LOVE Chick-fil-A's diet lemonade.  It is perfectly tart and refreshing on a hot Arizona day.  I'm telling you, this recipe does not disappoint!  It was easy to make and super delicious. 


{recipe via Cheerios and Lattes}

1.  Juice 8-10 lemons to make 1-1/2 C. juice.  My bag of lemons didn't give me quite enough juice and the ones on my tree outside are not ripe, so I added about 1/4 C. of bottled lemon juice.  That's probably a big no-no if you're a lemonade purist, but it turned out great in a pinch.

2.  In a large pitcher, mix lemon juice and 1 C. sugar or sugar substitute.  I used Nectresse, a new product from the makers of Splenda made from monk fruit.  Since my son is diabetic we are always looking for good, natural sugar substitutes.  This one is pretty good.

3.  Add 5-1/2 C. lukewarm water and stir until the sugar is dissolved.  Chill it until it's icy-cold and enjoy!  Or throw some crushed ice in a glass and enjoy immediately.


My day is looking brighter already!  Brent's contract job was extended six weeks, Sis's bedroom is looking awesome, and IT"S THE WEEKEND!!  Even when things go bad, they're not all bad.

8.22.2012

Awesome Eyewear from Firmoo

My kids have been back to school for a couple weeks now, but it seems like most everybody else will be joining us in the coming week or so. Back to school means hearing and vision screenings.  I keep my fingers crossed every year that my kids' eyesight stays great, but you just never know.  So many of my friends have kids who wear glasses {and more every fall, who get that fun note from the school nurse}that I was really excited to share a great source for eyewear that I just discovered.

Firmoo.com is a fabulous online eyeglasses store committed to providing customers with high-quality and fashionable eyewear at the most affordable prices.  Vision and Fashion the frugal way is the ultimate goal of Firmoo.   

I don't wear glasses myself, but I was super excited about their sunglasses, which can all be ordered with a prescription or not.  They have some really cute styles and fun colors.  These are the ones I chose:


They're such a pretty turquoise-green color that changes in different light as you can see above, but this is my favorite part:


How cute is that little bow on the side?!  That sealed the deal when I was trying to decide which pair to get.  They are really nice, high-quality glasses that are comfortable to wear.  I was super impressed with them when they arrived just a few days after I placed the order.
 
To encourage more people to try Firmoo's quality products and excellent prices, they have  launched a program offering free eyewear to first-time buyers. The glasses are simple to order and delivery is quick.  Just select your favorite frames, enter your prescription and select a couple other options {depending on the style} and you're good to go.

Wanna' try for yourself?    Visit Firmoo to get your FREE pair.  I'll be sporting my new shades all over town!

I was given this product to try and review for free.  All the opinions expressed in this post are 100% my own.


8.18.2012

Just Dance Just Sweat Dream Team Update


HI guys!!  I'm taking a break from the DIY-ing to talk a little about our experience with Just Dance this past month.  Many of you know that Brent and I have been using Ubisoft's Just Dance video game for the Wii as a regular part of our workout routine for the past little while.  We have always been big fans of Just Dance so it made complete sense for us to use it to workout.  

Our kids are really helping to keep us accountable and make sure we dance almost every day.  It's awesome now that they are back in school because we all get up earlier and get going.  I love to have a routine!! Whatever -- watch the video and we'll tell you all about it.


That pretty much says it all!  On a fun note, my little sister just got engaged so we have a little extra motivation to shape up before November.  We're so excited for Leslie and Eric, and for US because we get to see my whole family for the second time this year.  That, like, NEVER happens.}

See what all the other Just Sweat Dream Team members are up to here.

Thanks for checking in today.  Next week I have a yummy lemonade recipe recipe and a new project to share.  Have a great weekend!

8.13.2012

Big Plans and a Peace Offering

I'm still here . . . really, I am.  I've been working on a huge {H.U.G.E.} house project that I'll be sharing with y'all in October.  It's a little sad for me to be so excited about something and have to keep it under wraps for so long, but it will be totally worth the wait.  {I hope!}  Remember last October when I did 31 days of Pin-spired projects?  This year I'm going back to my interior design roots and doing 


I'm making over Sydney's bedroom from top to bottom, wall to wall, completely DIY with lots of tips and tricks for getting a whole new look on a TINY budget.  There will also be several Pin-spired projects in the room as well.If you like My 3 Monsters on Facebook, you'll probably get some sneak peeks along the way.

In the meantime, however, I've been working on a few other things.  Remember a while back when I was trying to post a couple new sheets of super-cool scripture quotes that can be printed on post-it notes every Sunday?  Who was I trying to kid?  I'm not good with consistency.  I hope you'll forgive me.  Today I am offering you seven pages of Book of Mormon Scripture Post-Its as a peace offering/ bribe to make you love me again.  *sheepish grin*


UPDATED 11/21/2015:  I have combined all the Scripture Post-its pages, downloads, and printing instructions into one convenient location here.  Hope that makes it easier for you to find everything you need!

Enjoy!  

I'm going to be up to my elbows in navy blue paint for the next couple of days, but I have a few other fun things in store so please keep checking in!

8.08.2012

Roadblocks


Do you ever feel like you're banging your head against a brick wall trying to get things done?  That has been my week so far.  I can't get our insurance to cover medical supplies we need for Riley, my phone has no dial tone, and NO ONE IN THE WORLD is willing or able to help me.  I have spent more hours on the phone this week (before it died yesterday) and chatting online with customer service people than any person should have to spend in one lifetime.  I don't mean to complain, I really don't.  These trials are relatively minor compared to lots of others.  I'm just at my wit's end and you, my interweb friends, are the only ones I can "talk" to right now, seeing as how my phone is down.  Not that I enjoy talking on the phone anyway, which just makes the events of my week that much worse . . .

First of all, I don't think it should be so hard to get your insurance to pay for things that your child needs to survive.  That's issue number one.  I'm not talking about improving his quality of life here.  I'm talking about the difference between him living and dying.  I've been paying cash for his stuff for the past couple of months while I'm trying to figure the insurance garbage out, but I shouldn't have to do that!

Secondly, whatever happened to customer service?!  I was on the phone for two straight hours on Monday, talking to 60 different people.  Each one was more eager than the last to transfer my call to someone else or give me another number I needed to call.  The last lady I talked to--she was last not because she resolved my problem, but because I couldn't talk for one more second -- must have thought I was completely emotionally unstable.  By the time I got on the phone with her I was already choking back tears.  When she gave me a new list of numbers to call I broke down, sobbing and pleading, "Why won't anyone HELP me?  I need someone to take five minutes and listen to what I have to say and HELP me."  I wasn't rude or unkind to her, I was genuinely distraught.  She was kind and encouraging, but still I just got three more numbers to call, all of which turned out to be dead ends, too.

I just got done chatting online with a phone company guy who told me I just had to wait for my phone to come back on.  "Can you give me an idea of when that might be?" I asked.  Today.  Just "today".  Ummmm, thanks, I guess.....

To top it all off, my bank account got hacked while I was in Colorado this summer so they flagged it in the fraud department.  How did I find out about that?  My debit card was declined last week when I was buying groceries.  Yep, me with a cart full of food and no way to pay for it.  Sweet.  After another hour-long phone call to the bank, I got to go set up new accounts and have NO ACCESS to our money while I waited for my new debit card to come five days later.  Luckily Brent could use his card, but that didn't help ME.  FOR FIVE DAYS.  I just had to laugh when I received FOUR new debit cards in the mail Saturday, all with different numbers.  And I still couldn't login to my account online because it was still flagged as fraud so I still didn't know which card I could use until I talked to the bank for another hour on Monday.

GAH!!!

Have you ever had a week like that?  Please tell me it's not just me!  I was so looking forward to this, the first week of school, to be alone in my home and blissfully happy sewing up a slipcover.  That might not sound like bliss to a lot of you {and, honestly, it's not really my idea of bliss either}, but I was looking forward to it.  Whatever.  There's always next week, right?

8.03.2012

{Back to School Fashion from Famous Footwear}

This is a Sponsored post written by me on behalf of Famous Footwear for SocialSpark. All opinions are 100% mine.

My kids go back to school on Monday -- YIKES!!  We're deeply entrenched in the "What am I going to wear?!" drama.  In my mind, back-to-school and new shoes have always gone hand in hand.  Really, I can't remember EVER starting school without new shoes on my feet. 

FF-BiggestVictory-GIF_300x250(1).jpg

If you're like me, you're always looking for a bargain, especially around back-to-school time.  I feel like I spend as much money now on clothes, backpacks, supplies, yearbooks, and fees as I spend at Christmas time.  It's C.R.A.Z.Y!  That's why I really like Famous Footwear.  They have all the coolest shoe styles {thousands of them} at reasonable prices and their stores are not overwhelming to shop with three kids.  Plus, their website is great.  I can shop online at famous.com from home and have it delivered to my local Famous Footwear store for free.  That is awesome!

Right now Famous Footwear is offering 15% off -PLUS- By One, Get One Half Off.  All you have to do is print the BOGO + 15% off Famous Footwear Coupon.  You can bump the savings up to 20% just by signing up for their free Rewards program.  Rewards members also:

• Earn 1 point for every $1 you spend in-store or online
• Accumulate points to earn certificates up to $100 a year
• Get a discount offer just for signing up
• Receive other special inside discounts and perks

Still not convinced that you need to head on over to Famous Footwear?  Look at these great back-to-school looks I threw together, starring some of their awesome shoes:

Those are the sweet Converse D will be sporting on the first day of 5th grade next week.  My seventh grader opted for a more classic style:

Sis, ever the fashionista, will be starting high school this year.  I don't get to pick her outfits any more, but here's what I think would be cute:

I adore those boots!  Maybe this is what I need to be wearing come Monday . . .   What?  There's no law against mom getting some cute new things to celebrate school starting, is there?  Print out your BOGO + 15% off Famous Footwear Coupon and redeem it at your local Famous Footwear store between now and August 18th, 2012.

What will your kids be wearing on their first day of school?

Visit Sponsor's Site


8.02.2012

Ruffled Wreath


After I made my ruffly tote bag last week, I had some scraps of ruffled fabric leftover.  I HATE to waste anything and I've had the same wreath on my door all summer {the horror!} so decided to make a little new door decor today.  I love the colors in these fabrics -- I think they're a fun, fresh take on a fall palette so this wreath will work through the end of summer all the way to Halloween.  

All you need is a styrofoam wreath form, some fabric scraps and a box of pins.  I had everything in my craft closet so it was totally free {my favorite price}, but it wouldn't cost very much even if you had to go out and buy everything.  I had a bunch of long strips of fabric that were zig-zag stitched down one side and gathered down the other so I just took those one at a time and started pinning them to the styrofoam with straight pins.  I made a small pleat in the fabric and stuck a pin in every inch or so all the way around.  When I got back to where I started, I folded the end under and overlaped it by about an inch.

I went back after pinning all three layers and hid some pins underneath the ruffles on the front surface of the wreath to make sure everything was laying flat and pretty.


You can't even see them when the wreath is hanging.  To finish the inside edge of the wreath, I took a long scrap of fabric that was about 1 inch wide and pleated it about every inch, hiding the pins underneath the pleats.


For a little finishing touch, I pinned on some scrappy rosettes. I made them just like I have in the past, but instead of hot gluing or sewing, I simply stuck a pin into the styrofoam after every turn or two.  


I used pins for everything on this wreath so that I have the option of using the wreath form again.  If I ever get tired of this style, I can just pull out all the pins and start over.  For now, I'm thrilled with how it turned out!  Not bad for about 30 minutes worth of work and zero dollars!


What do you think?  Have a great day everyone!

The 36th AVENUE

8.01.2012

Image Mapping: Why All the Cool Kids are Doing It {and How!}

You may all know that my blog here is completely self-designed {because I could never justify spending the money on a fancy-pants professional makeover} and that I am completely self-taught thanks to Google and a whole lotta' trial-and-error.  Well, I recently learned THE COOLEST trick that I wanted to share with you, my besties.  It will give your blog a fancy-pants feel, like all the cool kids' professional blogs and it only takes a few minutes!  Wanna' know what it is?

Image Mapping.

What is image mapping?  Well, in my super non-technical words, image mapping is what allows you to link several different URLs to a single image.  See my new header?  That's just one image I designed in Gimp, but if you click on the different labeled areas it takes you to different places.  Here's another example of my image mapping prowess:
Image Map


See how when you hover over certain areas of the image with your cursor you get the little handy-thing that tells you you can click and go somewhere.  I linked the URLs of all my previous project posts to this one image of my wall so that if you see something you like, you can easily find the tutorial.  Pretty cool, huh?

So, it seems like it might be kind of difficult, right?  Some of you have already tuned out, but stay with me here.  There's a site that pretty much does all the work for you called image-maps.com.  It's just about the coolest blogging tool out there right now. 

The first thing you need to do is upload your image to a hosting site.  I use Photobucket, but you could use whichever site you like.  The important thing is that you have a unique URL for your image.  When you go to the image-maps.com home page, enter that URL in the box that says "From a URL" then click Start Mapping Your Image.

After about 10 seconds, click the link that says "continue to the next step".  Here's where you'll end up:


Click the box in the right-hand column that says "rectangle" to highlight specific parts of your image and link them to a source.


Drag the box over the part of your image you want to link and adjust the size.  Enter the URL in the yellow box and click save.  If you want to link something else, just click rectangle again and follow the same procedure.  Once you have highlighted and linked all the areas of your image that you would like to, uncheck the box in the right column that says "Show Text Links" {unless you want text links listed underneath your image} and click the box that says "Get Your Code".  The next page looks like this:

Click on the HTML code tab up at the top of the page and the code for your mapped image will be in the box. Copy the lines of code and paste them into your blog wherever you want the image to appear.  

If you want to use it as a header or other design element, click the Design link on your Blogger dashboard.  Then click Layout from the list on the left.  Click on "Add a Gadget" and select HTML/Java Script.  Paste the code in the box and click save.  Drag the element where you want it on the page, preview the layout and click "Save Arrangement" up at the top of the layout page when you like where it is.

You could also embed the mapped image into a blog post by opening a new post window and clicking the HTML tab.  Paste the code in there, then switch to the Compose tab to finish writing your post.

See?  Totally simple!  I can't stop playing around with it.  It may seem a tiny bit daunting, but I urge you to try it for yourself.  The image-map site is really easy to use and you'll love the cool things you can do.  What do you think about image mapping?  Are you going to give it a shot?

Related Posts Plugin for WordPress, Blogger...