My 3 Monsters: May 2013

Recent Posts

5.31.2013

DIY iPhone Wallet Tutorial

diy smart phone wallet sewing tutorial at /

A while back I got a really cool case for my iPhone on one of those "deal of the day websites".  It was awesome because it not only held my phone, but it also had pockets for my driver's license and debit card.  I could even squeeze a little cash in there.  I didn't have to take the phone out to use the camera and it was super cute.  It was practically perfect in every way.

This may sound a tiny bit dramatic, but it was a life changing purchase for me.  No longer did I have to carry my giant purse when I was just dropping kids off at school or running a quick errand.  In fact, I barely carry a purse at all anymore.  It was a sad day when the "pleather" of that case started to separate on the inside and I knew it was time to move on.  I looked online, but I couldn't find another one like it.  In a last ditch effort, I decided to try to make a new one myself and after 3 tries, I finally figured it out.  

For the cost of about 1/4 yard of fabric and less than an hour's time you too can have a life-changing iPhone wallet!  Here's the scoop:

Pin It

5.30.2013

Consider the Lilies

This is a Sponsored post written by me on behalf of iBulb for SocialSpark. All opinions are 100% mine.

One of my favorite bible verses has always been Matthew 6:28-29 --

{To download this image I created, just click on the image to enlarge, then right click and save to your computer.}

I am a huge fan of fresh flowers!  Nothing lifts my spirits quite like a bunch of beautiful blooms.  My husband is awesome.  I can always count on him to bring me flowers for special occasions like our anniversary or my birthday, but it has taken me years {seventeen, actually, this month} to expand his floral horizons beyond red roses.

Nothing against red roses, of course, but there are so many more interesting options in the world!  I happen to be a little bit partial to bulb-flowers like tulips, irises and lilies.  They're sturdier -- at least it seems like they are -- and they last longer without requiring a lot of attention.  Lilies especially blend well with all kinds of flowers and smell sooooo good.

I'll feel like  I've really "made it" in life when I can keep fresh flowers in my house all the time.  Have you ever walked into a house with fresh flowers in it and not felt instantly more cheerful?!  That's what I love about them the most.  I also love that lilies come in such a wide variety of colors from white to pastel to bright and vibrant.  There's a lily for any season and occasion. 

Potted bulbs can be purchased at grocery stores, garden centers, and flower shops and they're reasonably priced, making them a perfect "just because" gift to brighten a friend or co-worker's day. 

For more floral bouquet inspiration {or even just a little eye candy to brighten your day} check out this awesome Pinterest page. 

I hope you'll come back tomorrow for a fun, quick sewing tutorial I've been working on.  Have a great day, friends!!


Visit Sponsor's Site


5.28.2013

Maple Peanut Butter

Maple Flavored Peanut Butter at /
 In our family we put maple syrup on lots of things -- from vanilla ice cream to grilled ham and cheese sandwiches.  Maybe it's because my husband grew up in Canada.  I don't know.  We just really like maple flavor around here.  So it was no surprise when our youngest son started making peanut butter and maple syrup sandwiches.  {It's really not that far a stretch from peanut butter and honey if you think about it.}

That has been his lunch-of-choice for the past couple of school years.  My only complaint about it is that syrup is runnier than honey so it drips off his sandwiches something fierce.  I hate finding little drips of sticky goo all over my kitchen counter top more than almost anything and cleaning up one's own messes is an art we have yet to master. 

But then I had a brilliant idea!  You can buy peanut butter and honey pre-mixed at the grocery store and it is delightful.  You can even by peanut butter and jelly pre-mixed.  Why not whip the maple syrup INTO the peanut butter to avoid all the messy drips?!  It worked like a charm . . . until it didn't.  Maybe one of you out there can explain this to me.

Maple Flavored Peanut Butter at /

I started out with a trial batch in my Kitchen Aid mixer.  I stopped to taste it after beating for about 30 seconds and it was pretty good.  I thought it just needed a little more maple syrup so I added one more squeeze and beat it again.  It got all crumbly and weird so I added a little more peanut butter to try to get back to the original proportions, but it just kept getting yuckier and yuckier until the oil started separating out of it and it felt like plastic.  Guh-ross!  So I threw that batch away and went back to my original recipe.  I would love to know the science behind what happened there -- was it too much beating?  I had originally intended to whip it until it became light and fluffy like whipped honey butter or cream cheese.  Is that just not possible with peanut butter?  I am absolutely perplexed.

Anyway, here's the recipe that works:

Maple Peanut Butter

1 C. peanut butter
1/3 C. maple syrup

Combine in a mixer {or by hand} and beat until just blended -- no longer.  Store in an air tight container.

Easy cheesy.  I spread some on a piece of toast for my lunch today and it was super yummy with a big glass of cold milk.

Maple Flavored Peanut Butter at /

If you like maple, give it a try!  If you know what happened with my original batch, please leave a comment and let me know.  It is a mystery to me.  Have a great day, friends.

PS . . . Please send good thoughts our way today!  My husband has a job interview and it would be really great if he could get back to work sooner rather than later.  Thanks!!


5.27.2013

Eight was Great!!

I promise this is the last post you will have to read about Girls Camp {until next year, if they ask me to come back}!  This was my 8th year in a row going to Girls Camp in one capacity or another.  This year I was asked to head up the craft cabin which meant planning several fun crafts that 100 teenage girls could make in about an hour.  I've shown you some of the ideas I was considering and one of the projects we actually did.  Today I wanted to show off some of my cabin decorating ideas.

I wanted to save as much of my budget as possible for crafting supplies so I needed to decorate the cabin for next to nothin'.  The camp theme was "Defy the Odds: Hunger for Righteousness" based {very loosely} on The Hunger Games and crafts was designated District 8: Textiles.  In my brainstorming I decided that using old sewing patterns would be really cute AND FREE since I have a ton of old patterns from when I used to think I had time to sew clothes.

If you've searched party ideas at all on Pinterest you no doubt have seen a few accordion flower backdrops.  They're just so festive and cheerful!  {And also free because I have a stash of scrapbook paper and wrapping paper that I could dip into, as well!}  Here's what I came up with:


It was the perfect backdrop to set the party mood in our cabin.  {I did end up buying one pack of those fuschia fans from Oriental Trading when I was ordering the books for the smash book project, but I had everything else.}


It's hard to see in the picture there, but we used sewing patterns topped with clear plastic to cover the tables. 


Of course, it didn't look like this for long!  Before long we had girls buzzing around, hot glue-ing and smash book-ing their little hearts out.  I was in absolute heaven for 3 days!  It's fun to watch the girls get excited about something they've never really done before.

Girls Camp is also a super spiritual high-point in my year.  These girls I am blessed to work with are so full of goodness and light.  They really are strong, valiant daughters of our Heavenly Father and I learn so much from being with them. 


The end of camp is bitter-sweet every year.  I miss it, but I'm not gonna' lie . . . it has been really nice to lay around in my jammies watching The Price is Right today {on my first official day of Summer Break} instead of running all over town gathering crafting supplies.  I just can't help but think {in the very back of my mind} of the projects we could do next year if  I get to be craft leader again . . . . oh, the possibilities . . .

5.24.2013

Mini Camp Smash Books
{Or What I'm Doing Today}

Today is Day 2 of Girls Camp.  I'm writing this post in advance, but I'm going to assume that things are going splendidly well and the girls are having more fun in the craft cabin than ever before.  #optimism

I wanted to show you one of the projects we are doing with the girls this weekend -- Mini Camp Smash Books.


You guys! Don't you love smash books?!  I have a whole board on Pinterest of smash book ideas -- many of them from my friend Emma.  I mean, I guess we're friends -- she used to babysit for us when she was young, but now she has an adorable baby of her own and she makes THE CUTEST smash book pages.  I love her.  So anyway -- if you haven't heard of them, Smash books are basically a return to old-school scrapbooking only waaaay cuter.

The idea began with this cute project from Dandee:

 
Adorable.  I thought it would be fun to go beyond the journal idea and let the girls start their own mini smash books with memories and mementos from Girls Camp. We bought the mini notebooks here.  I drew up some word art of the camp theme and made copies they can paste into their own books if they want.

Girls Camp Smash Books at /
We have all kinds of washi tape, post-it notes, ribbons and other cool stuff they can use to create some fun pages and get ideas for other things they can do when they get home.  These are a few of the pages I threw together as examples:

Girls Camp Smash Books at /
I also left plenty of room between these pages for journaling, photos and such.
.
Girls Camp Smash Books at /
Every group has to pick a spiritual song to sing at the Saturday a.m. "Morningside" program.  The music flips up so you can journal on the page beneath it.

Girls Camp Smash Books at /
The ribbon page markers are my favorite!!

What do you think?  Have you hopped on the smash book bandwagon? 

5.23.2013

Fresh & Easy Saves the Day!

This week is maybe the busiest week of my entire summer.  We had all the end-of-the-year assemblies and ceremonies at the beginning of the week and Girls Camp on the back end.  I have been spreading myself pretty thin trying to get everything done.  It was like an answer to my prayers when I was given the opportunity to shop at Fresh & Easy and try out some of their delicious family-friendly meals.

I have shopped at Fresh & Easy before so I knew what a treat this was and I was really excited to share it with all of you.  Brent, however, had never been inside Fresh & Easy before.  {How is that possible?!}  We took a while to just browse the store and check out all the goods.  We were looking for something to feed our family for dinner that evening, but it was hard to decide what to get because everything looked SO GOOD!  And {to beat a dead horse} FRESH!  And EASY!

The first thing that caught Brent's eye {and has always been one of my favorite things about Fresh & Easy} was the packaging.  The design is simple and clean, making the food inside the star of the show.  I love their 98 cent produce packs.  Absolutely perfect!

Here's what we finally decided on for our easy family dinner:


This pasta salad was so yummy.  The little balls of fresh mozzarella cheese and grape tomatoes were delicious.


Rotisserie Chicken with Mac & Cheese.  This is one of the family-size Kitchen To-Go meals in the refrigerated section.  {We must have been craving carbs!}  There were huge chunks of rotisserie chicken on top, but the bacon in the mac & cheese was what made the dish.  Can you believe that this only takes 7 minutes in the microwave to prepare?  Better yet, these meals are all made without artificial colors or flavors, added trans fats and high-fructose corn syrup.

We also got some Carnitas to make burritos and the Cheese Tortellini Kitchen To-Go meal with a side of Garlic Cheese bread for a couple other dinners.  {This week the garlic bread was free with the purchase of a family size meal.  Can't beat that!}  Our kids loved everything we bought, but their favorites were the mango lemonade and the mixed berry cheesecake.  Not together.  

I can't wait to get home from camp and make homemade pizzas with the Whole Wheat and Garlic & Herb pizza dough we also picked up while we were there.  I'm telling ya' -- we really had trouble deciding on just one thing!  Luckily the prices are so reasonable that you don't have to settle on just one thing.  PLUS, here's a great printable coupon for $5 off of a $20 purchase so you can try a bunch of their delicious meals, too.

Let's face it -- we're all busy and it's HOT outside!  I would do just about anything to not turn on the oven for the next several months.  Fresh & Easy is going to save my summer!


I was selected for this opportunity as a member of Clever Girls Collective and the content and opinions expressed here are all my own.

5.22.2013

Make Your Own Ironing Board Cover

HI friends!  I'm down to counting hours until I leave for Girls Camp.  I am equal parts excited and stressed out -- as usual.  I've been amassing a huge pile in my bedroom of everything I need to take with me for the craft cabin.  While I was laying in bed last night going over my mental to-do list I couldn't help but notice that my ironing board was super ugly.  I mean REEEEEALLY ugly.  Like all brown-spotted, charred, and water-stained ugly.  Like so ugly I didn't even take a before picture.  Plus, it didn't match my cabin decor.  {The horror!}

I've been thinking about buying a new cover for it for a while and just haven't ever done it.  This may come as a shock to y'all, but I rarely think about ironing so having a cute ironing board has hardly been a top priority.  {Until the cuteness of my craft cabin was in danger, that is.}  I have a few hours until I leave.  How hard could it be to just make one, right? So I decided to take some cute Amy Butler fabric from my stash and whip one up this morning.

Make Your Own Ironing Board Cover at /


Really, it was super easy.  I wish I had done it long ago, but sometimes I need a kick in the pants {like the shameful thought of all those teenage girls judging my ugly ironing board - lol} to get stuff done.  Here are a few really good tutorials that I looked at before diving into this project:


{from Sweet Verbena -- I pieced together fabric just like she did to get the right length.}

ironing1.jpg 
{from The Purl Bee -- I liked the idea of adding batting to give it a nicer feel.I just so happened to have some fusible batting on my sewing closet.  Lucky day!}

 ScreenShot2011-07-30at10.23.08PM-2011-08-2-11-30.png 
{from Sew Spoiled -- I instantly fell in love with this fabric!!}

 
{from The 36th Avenue -- I used elastic in my casing to hold the cover on just like this.}

Make Your Own Ironing Board Cover at /
 {mine!!}

I used different aspects of several different tutorials to create my cover.  However you do it, I promise you'll be thrilled with the result.  There's just something about a bright, pretty new cover to take the drudgery out of this less-than-favorite chore.

Have a great day everyone.  Wish me luck surviving camp!

5.15.2013

How to Make {Easy} Delicious
Whole Wheat Bread

Some of you long-time readers will recognize this recipe from a couple years ago.  Remember when my friend gave me a wheat grinder so I was obsessed with learning how to bake bread from scratch and my friend Sarah saved me by sharing the single best bread recipe in the world?  And then how I baked all my family's whole wheat bread for a year and I could recite this most perfect recipe by heart?

Only a few of you who are reading now now were around in the olden days of this blog when all of that went down so I thought I would share it again -- this time with pictures.  Because you just can't believe how light and yummy this bread is without seeing it.  Really.  Get a load of this:

How to Bake Bread at /

Just look at that!  And it couldn't be any easier to make.  These are the notes I received from Sarah based on her experience:
A few tips that helped me--(1) Use white wheat flour for a lighter, airier texture. Hard red wheat works fine, too, but it's a little denser and has a nuttier flavor. (2) This recipe (kneading time, etc) is written for a mixer and I'm not sure how to translate it to pure manpower. (3) You can buy wheat gluten and dough enhancer at the grocery store in the baking goods. They come in decent sized cans, good for probably 5 or 6 batches of bread.(These are what make it have a light, airy texture even though you are using 100% whole wheat flour.)
Here are my own notes, based on my own experience with the recipe:
 1. I have always used hard red wheat from my food storage and it is delicious.  I'd like to try it with white wheat flour sometime, but I have always just used what's on hand.  2. Wheat gluten is easy to find in the bulk bins of your local grocery store or health food store.  Dough Enhancer is another story altogether.  I had a tough time finding it locally and what I did find at Whole Foods was pretty expensive.  BUT you can make your own easily and it is worth the investment.  3. I usually cut the recipe below in half because that's all the 5 of us here can use while it's fresh {2-3 days}.  Half a recipe makes 3 good sized loaves for me. 
Whole Wheat Bread at /

 Basic Honey Whole Wheat Bread

9-13 c. whole wheat flour, divided
3 Tbsp. yeast
¾ c. wheat gluten
6 cups hot water
½ c. olive oil
1 c. honey
3 Tbsp. dough enhancer
1 ½ Tbsp. salt

Place 9 cups of whole wheat flour, yeast and wheat gluten in mixer. Mix for 1 minute. Add hot water and mix for 1 minute. Cover and let dough rise for 10 minutes, or until pretty close to the top.

Add olive oil (canola can be used), honey, salt, and dough enhancer. Turn on mixer and add 1-3 more cups of flour, once cup at a time until the dough pulls away from the side and is not super sticky. (Better to add too little flour than too much.)

Knead dough in mixer for 7-10 minutes. Preheat oven to 170º and grease pans. Lightly oil your hands and divide dough into 4-6 portions. Form into loaves and place in greased pans. Put into warm oven for 25 minutes to rise.

Then, without even touching the pans, turn the oven up to 350º and bake for 20-25 minutes (to internal temperature b/t 180º-195º). Place on wire rack to cool. I like to swipe butter over the top of the loaf when it's still hot.

Easy Whole Wheat Bread Recipe at /
 It makes your home smell absolutely heavenly and my kids think it makes the best PB&J sandwiches they've ever had.  It's not even too much of a time commitment -- generally less than an hour and a half from start to finish and most of that time you can be doing something else while you wait.  I'm the hero of the day whenever I bake this bread for my family and you will be, too.  Guaranteed!

I'll be linking this recipe up here:

 The 36th AVENUE

5.13.2013

S'mores Devotional Idea for Girls Camp

On of my most frequently pinned images from this blog is my S'mores Devotional handout that I used at Girls Camp last summer.  I realized just this week that I only shared the image and never shared the message that went with it.  It's pretty self explanatory, but I thought I would share that message today as I know many of you {like me} work with young people at church or at camp.  It is a great message that the girls really took to heart.  Here's the handout again, just in case you didn't see it before:

S'mores Devotional idea and printable handout for LDS Girls Camp at /

The devotional was based on this message from Sister Elaine S. Dalton, the Young Women General President at the time.  Her original message was directed to the leaders, but was easily adapted to apply to the girls.  This is my interpretation that I shared with my girls:

I want you to think about s'mores for a minute.  What is the best part of a s'more?  {The chocolate, the melty marshmallow.}What happens when you hold a marshmallow over the campfire?  {It gets all soft and gooey.} This experience we have had at camp has been wonderful.  We have spent several days away from the noise and busy-ness of our regular lives and taken time to focus on our Savior, Jesus Christ.  As you have felt the Spirit here your faith in God has grown.  Just like a marshmallows roasted over a fire, the fire of faith has softened your hearts. The gospel has become delicious to you and you will remember this time with joy.
I challenge you when you go home and back to the "real world" to keep these feeling alive.  Keep your heart soft and mooshy, just like a s'more!  How do you do that?  Look for the s'mores in your life:  S'more opportunities to feel the spirit, S'more chances to bear your testimony, S'more hard things to accomplish, S'more ways to serve others, S'more experiences reading the Book of Mormon, S'more times to show love. 
S'mores aren't just for camp!!  If you look for them, you will find s'mores all over in your life.  Once you begin finding the s'mores in your life, help your friends to find their s'mores, too.  The more s'mores you find the sweeter your life will become and the happier you will be. 
I finished by bearing my testimony to the girls and expressing my love to them and how I know that they are daughters of God and have divine potential.  I also gave them a little s'mores treat because everything is more fun with treats attached.  I've included a round-up of some of the cutest, yummiest-looking s'mores treats I have found all over the internet:


smores bark 1{I Knead to Bake}-- This is what I made for my girls, but I used Teddy Grahams instead of regular graham crackers to up the cute factor!


{Chef In Training}

I hope that helps some of you who are preparing for Girls Camp right now, too.  Have  a great week my friends!

I'll be linking up here:

The 36th AVENUE

5.12.2013

Happy Mothers Day One and All!


Got this from my daughter yesterday.  I love meatloaf so much!  I'll never cool it on the meatloaf.  Have a great day all you moms out there.

5.10.2013

Tiered Ruffle Apron Tutorial

It's getting to be that time of year again . . . Girls Camp is fast approaching.  In the past I have been busily preparing devotionals, costumes and treats for my girlies in my own Young Women group at church.  This year I have been given charge of the whole craft cabin.  It's like a dream come true, I tell you.  Not only do I get to coordinate all the craft projects that all the girls will be doing at camp, I get to decorate the craft cabin and my committee of crafty ladies.  Yes, I said decorate my committee.  Hence today's project.

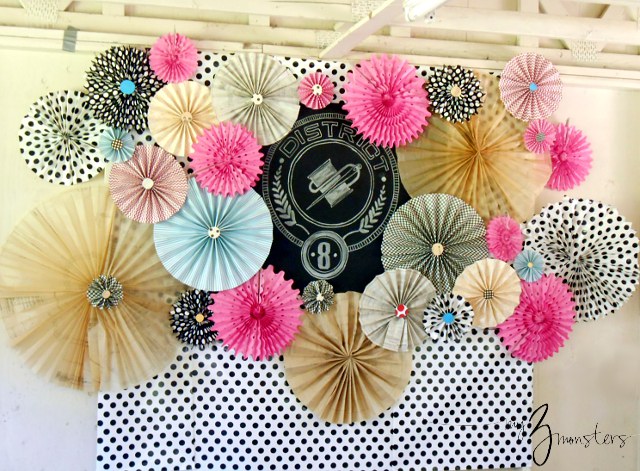
The theme for camp this year is Defy the Odds: Hunger for Righteousness.  The Hunger Games? How fun is that?!  Each group at camp is a different district and Crafts is {perfectly} District 8 or Textiles.  I am using old sewing patterns as table covers and I wanted to incorporate lots of fabric into our decor.  I thought it would be fun for all the workers to have something that identifies us as the helpers the girls can turn to.  That's where these fun tiered ruffle aprons come in.

Ruffled Apron tutorial at /

Each one only took me about 30 minutes to make.  Here's what you'll need:

Supplies

  • 1 piece of fabric 25-inches x 16.5-inches for base of apron {This fabric doesn't show so it can be muslin or something very plain and inexpensive.}
  • 4 strips of fabric 7-inches wide by the width of your fabric from selvage to selvage {about 42-inches usually} for ruffles
  • 2 yards of 1.5-inch wide grosgrain ribbon for waistband and ties
  • coordinating thread

Instructions

STEP 1:  Make a narrow rolled hem on three sides of each piece of fabric {the two short sides and one long side.}

STEP 2:   Gather the unfinished edge of your four long fabric strips to form ruffles.

STEP 3:  For evenly spaced ruffles without a ton of measuring, fold your base fabric piece in half by bringing the bottom hem up to the unfinished edge and pressing the fold with an iron to crease the fabric.  Fold fabric in half again by bringing the crease you just pressed up to the unfinished edge and pressing the new fold into a crease.  When you unfold your fabric you will have 3 pressed lines, like this:

Ruffled Apron Tutorial at /

Each crease will act as a sewing line for your lower three ruffles.  The fourth ruffle will align with the top of the fabric.  So easy, right?

STEP 4:  Lay fabric wrong side up on your work table.  Beginning with your bottom ruffle, lay your strip of gathered fabric wrong side up on top of base fabric along the crease closest to the hem.  Here's where it gets a teeny little bit confusing.  Pin the ruffle on so that it seems like it's upside down as shown here:

Ruffle Apron Tutorial at /

This way, once you sew it in place you can flip the ruffle down and hide the raw edge under the ruffle.  So go ahead and sew it in place, flip it down and press it so it lays nicely,

STEP 5:  Repeat step 4 for the next two ruffles.

STEP 6:  When you get to the top ruffle we're gonna' switch it up and confuse you again.  Lay your apron base on your work table so that the ruffles are down.  Align the raw edge of your top ruffle right side down with the raw edge of the apron base on the opposite side from the other ruffles, as shown:

Ruffle Apron Tutorial at /

Sew it in place then flip the fabric all the way over the top so it hangs with the other ruffles and press it in place.

STEP 7:  Line up the center of your ribbon with the center of your apron and pin across the top edge.  Stitch in place as shown:

Ruffled Apron tutorial at /

That's it, y'all!!  Simple enough to make and so happy-looking.  How could you be sad wearing an apron like that?

Ruffled Apron Tutorial at /
I conned Sis into modelling it for me {and all of you}.  It's so fun and girly she wants a whole skirt just like it!  She'll probably have to wait until after camp for that . . .

Ruffled Apron Tutorial at /

I love aprons, but what do you guys think?  Do you wear aprons when you cook and/or clean or is that just too 1950's for you?  Rest assured you'll be hearing more about my Girls Camp experience in the weeks to come.  Have a great weekend, friends!

I'll be linking this project up here:
The 36th AVENUE

5.09.2013

Chicken Wire Kitchen Cabinets {Part 2}

Howdy friends!  I got my cabinets done a day early so I thought I'd share them with you today instead of tomorrow, which means you'll be getting the ruffled apron tomorrow instead of today.  It's all good.  We're flexible here, right?  I am so excited about the way these cabinets turned out!  {Read Part 1 about how I got the chicken wire in there here.}   And here's what they look like now that I have finished all the painting:

DIY cabinet makeover with chicken wire at /

It really brightens the whole kitchen up.  I would never really have thought that I could have open cabinets like this because I don't have super pretty dishes.  Our kitchen is dinky so everything has to be functional.  Somehow when all my we-actually-use-these dishes are grouped nicely inside pretty white cabinets it makes them look nicer.  It's kinda like magic!

All I really did since the last time you saw these cabinets is paint the inside and finish the trim inside the doors with wood filler and a coat of paint, but look at a side-by-side of the huge difference it makes:

DIY chicken wire kitchen cabinets at /

I also reworked the layout of the dishes, but you can see it's all the same stuff.  If you are thinking about painting the interior of your cabinets I highly recommend using a paint & primer combination.  Even with that it took about 5 coats of paint to cover it evenly.  No joke -- 5 coats.  It was a real pain, but totally worth it.

Chicken wire kitchen cabinets at /

Here's a quick look at the before, during and after:

Adding chicken wire to kitchen cabinets at /

{Don't you love how in all three phases that one drawer is crooked and missing it's knob?  I really don't stage my home photos and there's your proof!} This cheap and easy project has added a ton of character to my boring 1980's builder's grade galley kitchen.  The weird thing is, now we are always slamming the cabinet doors.  Not on purpose.  They're just so much lighter now than they were before that they kinda' get away from you if you're not careful.   

My only regret in this project is that I didn't chicken wire the top panel of my pantry door while I was at it.  I guess it just gives me an excuse to go visit my friend Bob again. 

UPDATE:  Come see what the kitchen looks like today after changing the color of the lower cabinets and countertops!!

Thanks for dropping in today.  I hope you'll come back tomorrow for an easy apron sewing project.  Have a great day, friends!

 I'll be linking this project up here:
 The 36th AVENUE

Related Posts Plugin for WordPress, Blogger...